Well, Mummy has certainly outdone herself! Check this bad boy out:
How gorgeous is that?! I love the tila beads through the centre and the way the look like stained glass peeping out the rippled edges of the wings. Those seed bead edges also completely threw me with their perfection!
This outstandingly gorgeous bangle is available in our Etsy Shop here.
Endless drivel on my love affair with beads. With pictures - does that make it okay?
Showing posts with label cuff. Show all posts
Thursday, 1 September 2016
Saturday, 2 May 2015
Geometric 3-4-4 Bracelet in Gold & White
I had the urge recently to make a bracelet using Jean Power's Geometric 3-4-4 pattern that comes with the Geometric Series Set. I decided to go way out of my comfort zone and use gold and white - not a colour combination I have ever used before! I went for plain white opaque and then the gold duracoat delicas to add some seriously decadent glamour!
This is the finished product:
It starts with the first triangle... Here I needed some second opinions of the white and gold combination, which I showed to pretty much everybody! I didn't want the colour combo to be dull, just chic - not something I'm used to having to think about with my usual work!!
Once I'd made two of the power puffs, it was back out for more opinions. I really wasn't confident with my colour choices because these are two colours I hardly ever go to.
Slowly the bracelet grew...
...and grew some more
After a good 30g of beads and two weeks of work, this gorgeous bracelet was finished! As you can see, I made it into a bracelet with a magnetic clasp as I wanted it to sit closer to the wrist than a bangle would.
The clasp is pretty well camouflaged by the power puffs, which I'm pleased about as I didn't want it to be conspicuous or dramatically take away from the gorgeous design that Jean has given us.
This photo shows how the bracelet looks on with the gold triangles pointed outwards. I think I prefer it this way for some reason - don't know why though!
So there it is, my latest make. Hope you like it.
It is available in my etsy shop.
Friday, 20 March 2015
Golden Chocolate Rick Rack Bracelet
Oh my goodness it's been a while! I didn't quite realise just how long it had been though! Ooops...
Anyways, I have been incredibly busy with my needle, thread, beads and a smattering of Swarovski rivolis and am pleased to show you my latest bracelet:
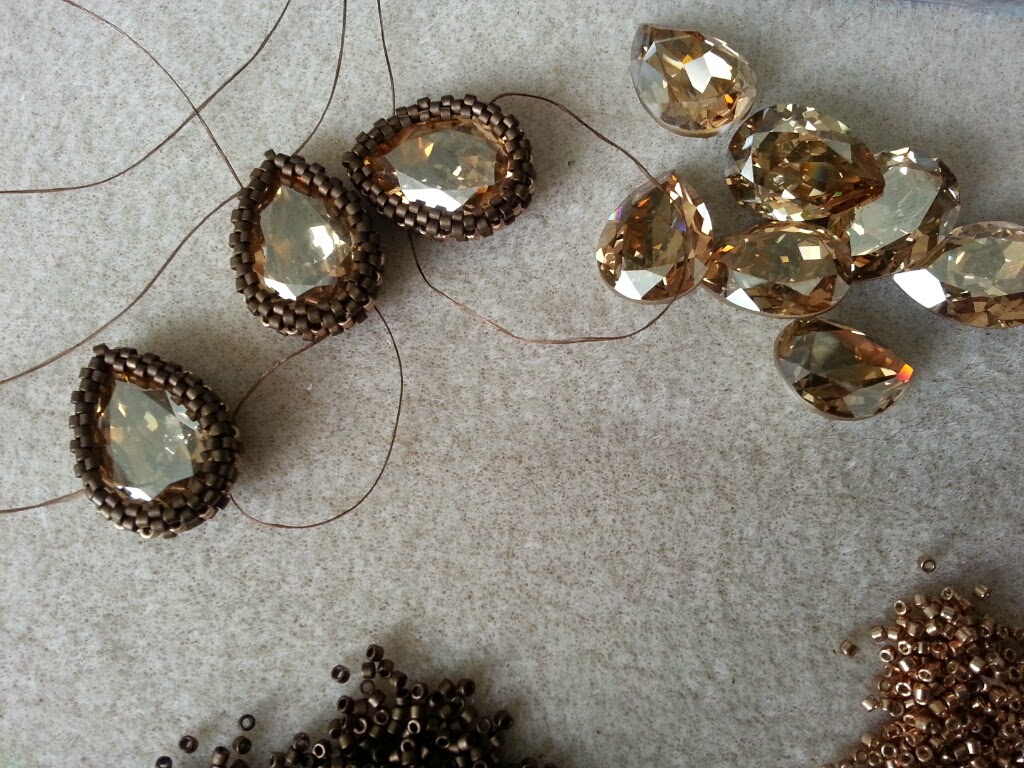
I used MRAW to bezel the Swarovski crystals (I used 18x13mm Pear Fancy Stones in Golden Shadow), which was surprisingly easy on the hands. The stones didn't pop out or misbehave in any way whist I was beading - highly recommend using this method of bezelling!
I used delicas in Dark Bronze Matte and Galvanised Light Champagne Duracoat for the front. I used the champagne for the ladders in the MRAW on the stones so decided to echo that in the main bracelet as well and then do a zigzag stripe of the gold to really draw those crystals into the design as a whole.
I've also finished another bangle that's along these lines but a teeny touch more bonkers - I'll blog it soon!
Anyways, I have been incredibly busy with my needle, thread, beads and a smattering of Swarovski rivolis and am pleased to show you my latest bracelet:
As you can see, I used Jean Power's amazing Rick Rack pattern, started off by using the incredible Contemporary Geometric Beadwork MRAW start. As this isn't the first Rick Rack bracelet I've done, I also made the Double Layer Rick Rack bracelet last year, I noticed that those delicious v shapes could be perfectly filled using Swarovski pear shaped crystals. This got me thinking....
I used MRAW to bezel the Swarovski crystals (I used 18x13mm Pear Fancy Stones in Golden Shadow), which was surprisingly easy on the hands. The stones didn't pop out or misbehave in any way whist I was beading - highly recommend using this method of bezelling!
I used delicas in Dark Bronze Matte and Galvanised Light Champagne Duracoat for the front. I used the champagne for the ladders in the MRAW on the stones so decided to echo that in the main bracelet as well and then do a zigzag stripe of the gold to really draw those crystals into the design as a whole.
As you can see in this shot, the bracelet is double layered. It could work single layered but I think that because I decided to use the bigger crystals, the body needed to be much more sturdy than a single layer. I'm a tight beader and even one layer of rick rack is pretty strong but I really didn't want this bad boy to buckle over time with lots of wear! The reverse of the bracelet is just plain matte dark bronze as there was no need for there to be any ornamentation as it generally won't be seen.
It was finished with a simple gold slide clasp, the loops of which were securely attached and hidden inside the bracelet to give it a fully finished and sleek look.
I must admit that I'm really proud of how well this bracelet turned out. It sits really closely to the wrist (well, mine anyway!) and looks quite chic and elegant - not my usual style at all! It is exactly what I imagined when I first put needle and thread to beads - that never happens! I hope you like it too.
Labels:
beading,
beads,
bracelet,
Cindy Holsclaw,
colour,
Contemporary Geometric Beadwork,
crystals,
cuff,
delicas,
etsy,
Geometric Beadwork,
geometry,
Jean Power,
Kate McKinnon,
Modified RAW,
peyote,
statement,
Swarovski
Wednesday, 17 October 2012
Pink Pinstripe Ruffle Cuff
As you may have realised from my blog and the work it contains, I seem to be drawn to the bigger statement pieces of jewellery rather than intense embellishment. I love clean forms and shapes that shouldn't be possible in beadweaving.
There is so much inspiration going on at the moment thanks to the amazing Jean Power. Her work inspired the magnificent Kate McKinnon which in turn inspired a whole group of beaders who came up with Contemporary Geometric Beadwork (and the Facebook page). This book will be utterly immense and I can't wait to see the paper copy as well as watching the subsequent evolving eBook. That's right, they're releasing an evolving eBook! Talk about bucking the trend!
Anyways, I was looking through the beautiful pieces that have been submitted by the beading community on the Facebook page and was hit by the beauty of Kate McKinnon's Horned Melon Cuff (have a look through the photos, you'll find it!) and this is what I was inspired to create:
I started with the incredibly elegant Modified Right Angle Weave (if you buy The Book then you get access to lots of pre-order goodies, including how the MRAW works - it is genius!) and a pile of Purple Iris Delicas (DB004) with a smattering of Silver Lined Fuchsia Delicas (DB1340) and set to work! This cuff evolved as I was making it - the amount of beads I had and the feel I was getting dictated how it would turn out, rather than having a complete design in my head before I picked up my needle.
In reality (rather than a pretty rubbish photo taken with my ancient BlackBerry!) the Purple Iris delicas sparkle and shine in an oil spill of purples and greens, darkening the Silver Lined Fuchsia from a girly Barbie pink to quite a dangerous, almost violent pink.
Here you can see the depth of the cuff.
So there you have it, a cuff that is nothing like I have ever made before, but now has me absolutely brimming with ideas for horns and wings and oh so much more! Go pre-order both Jean Power's Geometric Beadwork Book AND Kate McKinnon's Contemporary Geometric Beadwork - the books will flow pretty seamlessly I imagine because Jean is the keystone to the community effort curated by Kate. I can't wait to get mine!
There is so much inspiration going on at the moment thanks to the amazing Jean Power. Her work inspired the magnificent Kate McKinnon which in turn inspired a whole group of beaders who came up with Contemporary Geometric Beadwork (and the Facebook page). This book will be utterly immense and I can't wait to see the paper copy as well as watching the subsequent evolving eBook. That's right, they're releasing an evolving eBook! Talk about bucking the trend!
Anyways, I was looking through the beautiful pieces that have been submitted by the beading community on the Facebook page and was hit by the beauty of Kate McKinnon's Horned Melon Cuff (have a look through the photos, you'll find it!) and this is what I was inspired to create:
I started with the incredibly elegant Modified Right Angle Weave (if you buy The Book then you get access to lots of pre-order goodies, including how the MRAW works - it is genius!) and a pile of Purple Iris Delicas (DB004) with a smattering of Silver Lined Fuchsia Delicas (DB1340) and set to work! This cuff evolved as I was making it - the amount of beads I had and the feel I was getting dictated how it would turn out, rather than having a complete design in my head before I picked up my needle.
This is the view from the top.
In reality (rather than a pretty rubbish photo taken with my ancient BlackBerry!) the Purple Iris delicas sparkle and shine in an oil spill of purples and greens, darkening the Silver Lined Fuchsia from a girly Barbie pink to quite a dangerous, almost violent pink.
Here you can see the depth of the cuff.
So there you have it, a cuff that is nothing like I have ever made before, but now has me absolutely brimming with ideas for horns and wings and oh so much more! Go pre-order both Jean Power's Geometric Beadwork Book AND Kate McKinnon's Contemporary Geometric Beadwork - the books will flow pretty seamlessly I imagine because Jean is the keystone to the community effort curated by Kate. I can't wait to get mine!
Thursday, 6 September 2012
Contemporary Geometric Beadwork
Well goodness me! You may remember my Pyramids Cuff, well it will soon be published in Contemporary Geometric Beadwork, a book by Kate McKinnon inspired by the ever wonderful Jean Power!! I'm absolutely chuffed to bits. An actual something I made PUBLISHED!!!
Not only that, Jean has her very own book coming out as well soon based on her beading career! I may just faint with excitement!
I cannot wait to hold both these books in my hands and pore over all the wondrousness that they will contain.
Not only that, Jean has her very own book coming out as well soon based on her beading career! I may just faint with excitement!
I cannot wait to hold both these books in my hands and pore over all the wondrousness that they will contain.
Labels:
book,
bracelet,
cuff,
delicas,
geometry,
Jean Power,
Kate McKinnon,
pattern,
peyote
Monday, 28 May 2012
Jean Power's Honeycomb Bracelet
Mummy decided to have a quick make and this was the result:
Yep, the Honeycomb Bracelet by the utterly fabulous Jean Power! I know this piece is stunningly fast and very satisfying to make, not just because it makes up so quickly, but because it can be delicate and romantic, such as the one Mummy beaded here, or it can be dramatic and dangerous in other colour schemes. I made one in deep reds with blood red large beads around the outside and it was so completely different looking to the one that Mummy made that it just shows what a chameleon pattern it really is. And and absolute bargain at only £3!!!
Shame these colours don't really suite me though!! :(
Labels:
beading,
bracelet,
cuff,
delicate,
geometry,
Jean Power,
Mummy,
palette,
pattern,
RAW,
repetition,
seed beads,
Shaped Beadwork
Saturday, 11 February 2012
Showcasing Mummy's Work
As you've seen, I mainly seem to do big and bold beadwork. My Mum, however, is a much more delicate beader. Her work has a timeless elegance and a grace that I simply cannot emulate - no matter how hard I try! I thought that in this post I would showcase some of her work so that you can see how different it is to mine. Her choice of pattern, her palette and the style is ephemeral and daintily beautiful. We are complete opposites in our beadwork and I adore pretty much everything she does.
This piece was from a pattern (unfortunately I can't remember where she found it) and I love how she used a creamy seed bead with that warm amber colour as the accent. It's delicate and lacy and just so elegant.
This was another piece that she made from a pattern, and even though she's done it in haematite and black glass, she still makes it look so delicate and feminine. This necklace looks blooming gorgeous whenever it's worn!
A choker this time, in a modified Right Angle Weave. I'd have been tempted to do this in all black but she conjures up the Renaissance with her colour choices.
This was her first ever cabouchon! How unbelievably neat is that?! She thought the delicacy of the rose quartz would be lost on a beaded rope so instead she found some pale pink organza ribbon that matched the cabouchon perfectly and used that instead. It tied at the back in a large floppy bow and is ultra femme.
Mummy's very lucky in that she can go from being uber glam to being right in there with block colours and chunky cuffs! This was a pattern in one of the beading magazines we buy (either Beadwork or Bead & Button) and she absolutely adored it as soon as she saw it. The closure on the original pattern was with Margaritas but she wanted to echo the Art Deco drama so used gunmetal cubes for the closure instead. Personally I think this works better than the original pattern!
And then we go right back to old school Victorian beadweaving. She's a bloody marvel! I love this pattern so much because it sits at the base of the throat, collar length, and really makes you feel like a princess when you wear it!
And then once in a while she will make a real show stopper like this Gothic Reticule. We are lucky that in Leicester we have a huge selection of fabric shops and The Golden Mile, which is host to not only the most beautiful and ornate jewellery shops, but also a delicious array of Indian fabric shops selling the most exquisite silks and saree material. Together we trotted off down there to gasp at the opulence and she bought this fine silk fabric with which to line the reticule.
And then she made a bridal one in a slightly different pattern. Unfortunately this picture doesn't even begin to to do this reticule justice, nor does it show the detail of the tiny brick stitched hearts around the top.
So there you have it. This is all the work of my fabulous Mummy. I hope you enjoyed it as much as I always do. We are polar opposites - I think that just adds more depth and fun to our beading adventures in that we can look at the same component and dream up completely different ways and styles to use it!
This piece was from a pattern (unfortunately I can't remember where she found it) and I love how she used a creamy seed bead with that warm amber colour as the accent. It's delicate and lacy and just so elegant.
This was another piece that she made from a pattern, and even though she's done it in haematite and black glass, she still makes it look so delicate and feminine. This necklace looks blooming gorgeous whenever it's worn!
A choker this time, in a modified Right Angle Weave. I'd have been tempted to do this in all black but she conjures up the Renaissance with her colour choices.
This was her first ever cabouchon! How unbelievably neat is that?! She thought the delicacy of the rose quartz would be lost on a beaded rope so instead she found some pale pink organza ribbon that matched the cabouchon perfectly and used that instead. It tied at the back in a large floppy bow and is ultra femme.
This was made from a pattern from The Bead Shop kit that she bought a few years ago. The beads that came with it were much more vibrant but she loved how the pattern flowed so she made it in silver and amethyst. It looks so delicate but is actually pretty robust!
Mummy's very lucky in that she can go from being uber glam to being right in there with block colours and chunky cuffs! This was a pattern in one of the beading magazines we buy (either Beadwork or Bead & Button) and she absolutely adored it as soon as she saw it. The closure on the original pattern was with Margaritas but she wanted to echo the Art Deco drama so used gunmetal cubes for the closure instead. Personally I think this works better than the original pattern!
And then we go right back to old school Victorian beadweaving. She's a bloody marvel! I love this pattern so much because it sits at the base of the throat, collar length, and really makes you feel like a princess when you wear it!
This is another of her cuffs made using elements from Jean Power's Freeform Cuffs and then framing the beads. I love how subtle her colours are and how they blend and complement so perfectly. Her refined use of colour is what I am most jealous of.
And then once in a while she will make a real show stopper like this Gothic Reticule. We are lucky that in Leicester we have a huge selection of fabric shops and The Golden Mile, which is host to not only the most beautiful and ornate jewellery shops, but also a delicious array of Indian fabric shops selling the most exquisite silks and saree material. Together we trotted off down there to gasp at the opulence and she bought this fine silk fabric with which to line the reticule.
And then she made a bridal one in a slightly different pattern. Unfortunately this picture doesn't even begin to to do this reticule justice, nor does it show the detail of the tiny brick stitched hearts around the top.
Finally, Mummy at her most simple. A plain peyote tube hung with haematite arrows and slid onto a neck wire. Gorgeous.
So there you have it. This is all the work of my fabulous Mummy. I hope you enjoyed it as much as I always do. We are polar opposites - I think that just adds more depth and fun to our beading adventures in that we can look at the same component and dream up completely different ways and styles to use it!
Labels:
beading,
bracelet,
brick stitch,
cuff,
delicas,
delicate,
inspiration,
Jean Power,
Mummy,
necklace,
netting,
palette,
pattern,
pearls,
peyote,
random,
RAW,
seed beads,
square stitch
Saturday, 4 February 2012
Pyramids Cuff
A while back I bought 50g of Sand Dune Mix delicas and knew I wanted to do something pretty outrageous with them but couldn't think exactly what! I started making a really fat RAW neckerchief with them that went from jaw line to cleavage but I don't like the way delicas look in right angle weave. They just don't lend themselves well, in my opinion. I wanted something a bit punky and really contemporary but just didn't know what.
So I started perusing Jean Power's website for some inspiration because I love her patterns and she knows her geometry! Then I moseyed through my various beading books and my eye was caught by Diane Fitzgerald's Shaped Beadwork. I've made a few of the pieces in the book but knew that I just wanted the starting blocks for something of my own design.
Finally, I found inspiration in the most unlikely of places! My friend came round for a cup of tea and she was wearing a square studded belt and I just knew that the delicas could make that happen!
This is the result:
I started out just seeing if I could actually make a beaded pyramid. I used Diane Fitzgerald's square for the bottom and half of the Octabead (but added rows to make it taller) and it worked!
Here you can see the bottom. They're surprisingly sturdy, which is good as it wouldn't do to have them collapse on themselves!
I started laying them out to see if they'd work but then had to think about joining the little buggers! When I first zipped them together at the base the whole structure was just too stiff and unwieldy. I tried adding a couple of rows of peyote in between, but that just looked rubbish.
Looking through my crystals stash brought me the perfect solution - half gold Swarovski 4mm bicones. They gave the flexibility and because they aren't fully 'blinged up', they really work with the delica mix.
As you can see here, I made a simple open triangle (again, from the Shaped Beadwork book) and toggle clasp to echo the pyramids.
And here's what it looks like on.
And the clasp.
It's a bit mad and definitely not to everyone's taste but I'm glad it turned out pretty much as I imagined it, punky and contemporary all at the same time, yet the Swarovski adds some femininity and bling!
Tuesday, 31 January 2012
What To Do With All Those Leftovers: Bead Soup
Over the years I have become very lazy when I finish a project and usually end up putting all the leftover beads in a little bag and then just leave them in my drawer of randomness! I know I should sort them all out and get the beads back in their original boxes but that just seems so dreary when my head is already full of the next project!
So I decided that I would start working my way through these small bags of 'bead soup' and see what kind of things I could make to use them up - I can't extol the virtues of bead soup projects enough!
These two necklaces were my first attempt at getting rid of those bead soup bags. I started with a peyote base of random seed beads and just kept on embellishing until I couldn't fit a single bead more on there. I like the brown and green one more than the silver/red/black one but they both helped use up those pesky leftover beads.
This one was another bead soup leftover bag but just in red. I decided to make a simple Potowatomi chain in red seed beads and then embellished the toggle and loop clasp so that it would hang at the front. All the fizz helped disguise the clasp and used up some pretty ugly beads at the same time!
This one was a slightly different kind of leftovers necklace, in fact these seed beads were left over from the necklace at the very top of this page! I threaded a few beads on jump rings and then linked the jump rings to each other to make a cascade. It's not something I'll ever do again though because opening and closing all those blooming jump rings hurt my thumbs! I now have a huge respect for people who can sit and make chainmaille!
This was a small bag of shell spacer beads that Mum had left over. She thought they looked like Nestle's Smarties so made a simple peyote band with a picot edging and randomly added the shell beads. Gorgeous isn't it?
Another leftover soup necklace. I don't often use gold in my beading but was bought a load of gold and brown beads. My sister had this and said she wore it out with a posh evening frock and it looked fabulous.
Then I had a few more of the golds and browns left so I gave them to Mummy and she made a cuff.
This cuff was an experiment that went horribly wrong! There is nothing I like about this cuff at all! The bead soup didn't do justice to the amazing focal bead so it didn't last long - it was cut up and the beads were put back in a bead soup bag for another day. I include it only to show that not every bead soup project works!
These three cuffs are all made on the same theme - plain silver peyote base with a picot edge to complement the larger beads in the embellishment - perfect for when you don't have a huge amount of bead soup left!
Another red embellished cuff.
And finally, possibly my favourite of all my bead soup necklaces. This one was given to my Nanna, along with some matching but not the same earrings (of which I didn't take a photo). I love the bright purples with the deeper, richer iris beads and then every so often seeing a silver sparkle crystal poke out. The movement of this piece and the jumble of beads makes me laugh every time I see it because it really does force you to look at it and then follow the beads all the way round. It's a very chipper necklace and I know that Nanna wears it often.
Labels:
bead soup,
beading,
bracelet,
brick stitch,
crystals,
cuff,
gifts,
inspiration,
necklace,
netting,
palette,
peyote,
random,
RAW,
repetition,
seed beads,
Swarovski
Subscribe to:
Posts (Atom)