Showing posts with label Geometric Beadwork. Show all posts

Thursday, 1 September 2016

Raspberry Ripple Bangle

Well, Mummy has certainly outdone herself!  Check this bad boy out:


Mummy has totally twisted my melon with this awesome bangle! 
It will be available in my etsy shop soon 
#beadwork #beadweaving #craft #handmade #bracelet #bangle #delicas #tilas


How gorgeous is that?!  I love the tila beads through the centre and the way the look like stained glass peeping out the rippled edges of the wings.  Those seed bead edges also completely threw me with their perfection!


Love how the tilas act like stained glass on Mummy's latest bangle, so pretty.
It's now up for sale in my etsy shop https://www.etsy.com/listing/232455504/raspberry-ripple-bangle-geometric-bangle
#beadwork #beadweaving #craft #handmade #bracelet #bangle #delicas #statementjewellery #etsy #pink #red #metallic #seedbeads #beading #beadworkforsale #tilas #olive #jewelrydesign #jewelryforsale


This outstandingly gorgeous bangle is available in our Etsy Shop here

Thursday, 25 August 2016

Tiny Triangle Earrings

Regular readers will know how much I love and am inspired by the works of Jean Power, especially her triangles.  They're so simple and yet so versatile.  Recently I needed to make a small thank you gift for someone and Jean came to the rescue again!


Tiny little triangle earrings were perfect!  

I bead around the post rather than glue the post to the finished triangle, mainly because you never know what people are allergic too, and the glue could dry prickly - never good!

I ended up making these for all my friends in all sorts of colours:


They are available for only £5 in my Etsy shop here


Wednesday, 10 August 2016

A Day With Jean


As a gift to Mummy for organising the wedding for me and Chris, we aarranged to have her spend the day with Jean Power in an intimate one on one lesson.  Mummy is amazing and said that I could join them too though!


It was utterly amazing!!!  She bought all her finished pieces along and we saw pretty much the entire contents of her gallery in real life, which was AMAZING!

We decided to choose three things and have a jam packed day of learning: Icos Pendant, Beaded Frames and the amazing Interlocking Crystals and it was outstanding how much we learned from her.  The wedding was the best day ever but this came a close second!

This is mine and Mummy's work for the day:


Saturday, 2 May 2015

Geometric 3-4-4 Bracelet in Gold & White

I had the urge recently to make a bracelet using Jean Power's Geometric 3-4-4 pattern that comes with the Geometric Series Set.  I decided to go way out of my comfort zone and use gold and white - not a colour combination I have ever used before! I went for plain white opaque and then the gold duracoat delicas to add some seriously decadent glamour!

This is the finished product:


It starts with the first triangle...  Here I needed some second opinions of the white and gold combination, which I showed to pretty much everybody!  I didn't want the colour combo to be dull, just chic - not something I'm used to having to think about with my usual work!! 

Once I'd made two of the power puffs, it was back out for more opinions.  I really wasn't confident with my colour choices because these are two colours I hardly ever go to.

Slowly the bracelet grew...

...and grew some more
 After a good 30g of beads and two weeks of work, this gorgeous bracelet was finished!  As you can see, I made it into a bracelet with a magnetic clasp as I wanted it to sit closer to the wrist than a bangle would.

The clasp is pretty well camouflaged by the power puffs, which I'm pleased about as I didn't want it to be conspicuous or dramatically take away from the gorgeous design that Jean has given us.

 This photo shows how the bracelet looks on with the gold triangles pointed outwards.  I think I prefer it this way for some reason - don't know why though!

So there it is, my latest make.  Hope you like it.

It is available in my etsy shop.


Monday, 27 April 2015

Ultra Blue Swarovski Triangle Necklace

I've been making so much big jewellery recently that I fancied a bit of a change so I decided to make a pendant inspired by Jean Power's Heroine Necklace.  

This is what I've made.


I bought a 14mm Swarovski Ultra Blue rivoli and used Jean's method of bezelling (not sure I'll ever go back to doing it the old way to be honest!) and then had to figure out the maths to make the triangle even and integral to the bezel.  Lots of trial and error as maths really isn't my strong suit!I used silver duracoat delicas and silver duracoat seed beads in size 15.

The triangle didn't look great until I zipped the edges together and then it became a very solid and firm triangle.  In this shot you can see how I was inspired by the clasp of the Heroine necklace, although this one is solid, rather than being a tremendously clever three way clasp!

I left the back of the rivoli open so that light can travel through it and make it shine.  Also, I quite like the back being blue, rather than the usual silver or gold foil!

I added a very small and simple square stitched bezel and sewed it closed with the sterling silver chain in situ so that it was tight around the chain, not so tight that the chain won't move, but tight enough that it won't slide off the end when putting it on and taking it off.

I hope you like this simple necklace.  It is Available in my etsy shop here.

Tuesday, 21 April 2015

Swarovski Heliotrope Necklace & Earrings

I've been concentrating so much on geometric beadwork for the last few years, after being heavily influenced by the unbelievably fabulous Jean Power and the work she inspired for the Contemporary Geometric Beadwork community started by Kate McKinnon, that I recently felt like I needed a bit of a break from structurally impressive beadwork. I didn't start off with this necklace and earrings set in my head.  Originally I was going to make an asymmetric and bonkers necklace inspired by Jean's Marun Bracelet but as I was bezelling all the rivolis, my plan changed and  I decided to make something a lot more traditional and basic.  I needed some serious sparkles in my life and some old school Hollywood glamour! 

I chose silver duracoat delicas for the simple reason that I wanted the rivolis to take centre stage.  I did think about other colours, but wanted simplicity of form and background colour to fade so those rivolis really sang.

This is what I made:


It's an extraordinarily simple but uber glamorous necklace made using Swarovski Heliotrope rivolis in an assortment of sizes (from 12mm to 18mm), with a 27mm vintage Heliotrope Reverse Fancy Stone as the centrepiece.


I started by using Jean Power's obvious, but previously unthought of, method of bezelling smaller rivolis (soooo obvious now she's pointed it out here!)

It felt like a never-ending bezelling job!  Although I did find some Swarovski 2AB bicones in my stash that I had utterly forgotten about that went beautifully with the heliotrope rivolis.

I don't think I was even half way finished at this point!  (I also really need to do something about how messy my bead tray gets when I'm creating!)

Then came the moment to bead that gorgeous vintage Heliotrope Reverse fancy stone.  No picture can do justice to this bad boy!  It has some serious sparkle and the colour is just so intense.  I love it!

I started joining the rivolis using the bicones.  I used 3mm bicones round the back to join the 12mm rivolis and then switched to 4mm for all other sizes.

Halfway there and the threads are starting to be tamed!

I decided to use a sterling silver magnetic clasp on this necklace.  Mainly for aesthetics, but also I would be absolutely distraught if someone was wearing it and it got caught in something and ripped - it would be such a waste of a lot of work!

Look at all those rivolis!  Sparkles from every angle!

I enjoyed making the necklace so much I decided that I would make a pair of simple matching earrings.  I don't often make earrings - generally I find them too small and fiddly - but this time I knew that they would compliment the necklace perfectly.

One earring done...

And finally I made its match.  They're extraordinarily simple and pretty plain.  I really just wanted the rivolis and the bicones to do the talking.

It is available in my etsy shop here

Friday, 20 March 2015

Golden Chocolate Rick Rack Bracelet

Oh my goodness it's been a while!  I didn't quite realise just how long it had been though!  Ooops...

Anyways, I have been incredibly busy with my needle, thread, beads and a smattering of Swarovski rivolis and am pleased to show you my latest bracelet:


As you can see, I used Jean Power's amazing Rick Rack pattern, started off by using the incredible Contemporary Geometric Beadwork MRAW start.  As this isn't the first Rick Rack bracelet I've done, I also made the Double Layer Rick Rack bracelet last year, I noticed that those delicious v shapes could be perfectly filled using Swarovski pear shaped crystals.  This got me thinking....


I used MRAW to bezel the Swarovski crystals (I used 18x13mm Pear Fancy Stones in Golden Shadow), which was surprisingly easy on the hands.  The stones didn't pop out or misbehave in any way whist I was beading - highly recommend using this method of bezelling!


I used delicas in Dark Bronze Matte and Galvanised Light Champagne Duracoat for the front.  I used the champagne for the ladders in the MRAW on the stones so decided to echo that in the main bracelet as well and then do a zigzag stripe of the gold to really draw those crystals into the design as a whole.


As you can see in this shot, the bracelet is double layered.  It could work single layered but I think that because I decided to use the bigger crystals, the body needed to be much more sturdy than a single layer.  I'm a tight beader and even one layer of rick rack is pretty strong but I really didn't want this bad boy to buckle over time with lots of wear! The reverse of the bracelet is just plain matte dark bronze as there was no need for there to be any ornamentation as it generally won't be seen.

It was finished with a simple gold slide clasp, the loops of which were securely attached and hidden inside the bracelet to give it a fully finished and sleek look.  


I must admit that I'm really proud of how well this bracelet turned out.  It sits really closely to the wrist (well, mine anyway!) and looks quite chic and elegant - not my usual style at all! It is exactly what I imagined when I first put needle and thread to beads - that never happens! I hope you like it too.


I've also finished another bangle that's along these lines but a teeny touch more bonkers - I'll blog it soon!


Friday, 25 April 2014

Mummy's Crystal Triangle Earrings

Once again, Mummy is the creator behind the pieces in this post (I really need to get more beading time in!).

Inspired by the most marvellous Jean Power and the triangles she is famous for, Mummy decided that she wanted to see if she could use the triangles as a bezel in which to hide some delicious little Swarovski rivolis.  Of course, she couldn't stop at the making of one pair of earrings, so made three!


How sweet are these gorgeous little earrings?!  Unfortunately, the light was rubbish (blooming England in Winter) so you can't get the full delight that these earrings are.  The back side is a simple triangle and then decreased around the front, using 3mm rounds at each point, which helps stop the rivoli wriggling about in it's triangular cocoon, and then sparklied up with a picot edge in 15s.  I love this set in gunmetal and steel with the smoky grey rivoli.  Very me!


Isn't it strange how a different colour can change the whole look of a piece?!  The exact same pattern as above, just with shades of pink yet they look so delicate and girly and definitely not something that I'd wear (sorry Mummy!).

And then again, with black and dark red.   These look quite gothy compared with the more industrial gunmetals and the girly pinks.  I love them!

 like how the rivoli is completely encapsulated at the back, reducing the risk of the point being knocked off and ruining the whole earring. Also, how different these earrings look just with a change of colour.  It always astonishes me that colour plays such a huge part in the whole feel of a piece, even something as small as a pair of earrings.  I shouldn't be so surprised but because I'm rubbish and generally have my go to colours, I always am!  If Mummy had just shown me the pink set, I would have been impressed with the construction, but never in a million years thought they were my bag, yet the exact same earring in the gunmetal and steel may simply have to find their way into my jewellery box!

Monday, 10 March 2014

Ombre Cabouchon Necklace

Real life has kind of taken over recently, in a very wonderful way, which has meant slightly less time to bead.  I'm beginning to get back on the beading wagon, with ideas falling out of my head and onto paper.  Until they get to needle and thread time, I thought I'd show you something I made late last year.

I was given a commission before Christmas to make a simple necklace with a layered onyx cabouchon and a simple ombre chain.

The lady I made it for wanted it as a gift for her Mum and she chose the cab, as well as the colours and the base design.  She wanted the colours to bleed into each other and the clasp had to be beaded as well, as her Mum doesn't do well with any metals.

This is what I was given to work with - she wanted black to be the predominant colour in the chain with just a small bit of white showing either side of the pendant dropper:


My first step was to bead the cab. A nice easy job, but for my own hatred of matte beads - the more you handle them, the less matte they become (oils in skin etc) and they really bugger up the thread!  I'm used to working with quite a lot of thread but have to use much smaller lengths as it frays more due to the rougher bead surface.  The trouble is, matte beads really do lend themselves to many projects, and the matte beads against the highly polished surface of the stone was just beautiful.

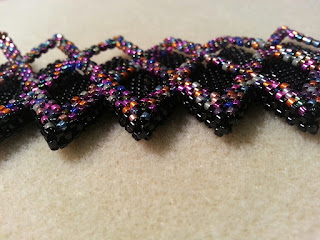
Then came the rope itself! We opted for a simple 6 round herringbone rope, not twisted, not lazy, just a simple rope.  This made the bleeding of the colours really work and although you can barely tell that the pinky pale brown turns into silver before heading into white, I really like this for the effect. 

Here you can see the rope width against the cabouchon.  Not too clunky and thick, but not so delicately thin that the cab looks ridiculously chunky!  To be honest, it took a little while (and lots of samples!) to settle on this width because although I liked the eight round rope, it would have been far too chunky for the lady in question.  I also always tend to veer towards the large and chunky rather than the thin and delicate.


Getting the rope even on both sides, but still random looking was an absolute nightmare! Not a very good picture below, you can see the warped square found in Geometric Beadwork by Jean Power that I used to hang the cabouchon.  Because we only wanted a small amount of white beads to peep out either side on the rope, I thought Jean's ingenious design was the way forward.


And then we moved to the clasp.  The loop is a simple peyote circle that I beaded and then joined the herringbone rope to and the toggle has a loop that loops through the continuous herringbone loop on the other end of the rope.  I prefer to make my beaded clasps like this rather than a simple loop and toggle (or bigger bead) joined by a few beads because it makes them look a little more interesting and a touch more finished.

The completed piece:

I know the lady's Mum liked it Christmas morning and I hope you do too!  It's very different from all the geometric work I've been doing recently.

Sunday, 12 May 2013

Double Layer Rick Rack

It's been aaages since I last blogged.  Probably because it's taken me a good long while to make my newest bracelet!

As you know, Kate McKinnon recently released the amazing Contemporary Geometric Beadwork, an absolutely astounding book which I reviewed here and which you can buy here (USA) and here (UK).  I loved the zigged MRAW band so much, and after seeing Jean Power's absolutely exquisite Double Rick Rack in her book, Geometric Beadwork, which I reviewed here, and I just knew I needed to put the two together!  Jean shows how to do a flat Rick Rack, which is what I wanted to make, rather than a bangle.  I wanted this cuff to sit close to the wrist and her method of turning was so elegantly simple that I was quite frankly blown away!

I decided I wanted to use a black opaque background and then use a really bonkers mix of galvanised delicas.  I literally got all the duracoats  I had in my stash and mixed a great big dollop of beads (which I'm really not looking forward to separating out again).

Here I am after only a few rows of beadwork on each side.  Using the zigged band was fantastic because it meant that the sizing was pretty accurate even after just making that. I was a bit dippy doing all of the MRAW in opaque black though - when I was joining the two layers at the end, it sent me quite cross-eyed trying to follow where I was!

I had a hell of a time doing both layers together though, the thread wanted to wrap itself around all those gorgeous points pretty much every stitch I made.  I really ought to figure out a better way of keeping my thread out the way!

In this picture you can see that the top open layer just wanted to go every which way! 

And then I was done - finally!  The bracelet from the back looks quite dull in this photo but in real life you can really see how the beads change direction and the difference in the way the light behaves off their surface.  I like that this bracelet could be worn this way, as although it doesn't really pop with colour, the direction changes and the overall thickness gives it quite the impact.

I sewed through the turn beads on the ends and all I did was attach jump rings and a slide catch.  To be honest I may change the jumps to something slightly smaller so it sits a tiny touch tighter on my wrist but they were all I had to hand when I was finishing up this evening.

And  here is the finished bracelet, face on.  Hope you like it.