Showing posts with label challenge. Show all posts

Wednesday, 20 August 2014

Tangle Of Angles Bangle

Whilst I was off work, apart from the Raven Star Bangle, I also started another bangle. I decided to go way out of my comfort zone and make something out of colours that I personally never wear, silver lined bronze and gold lined cream.

 I call it the Tangle Of Angles Bangle because as I was making it, I decided to really push myself on the number of horns and gave it 14!  The most I'd ever done before that was 12 and my goodness it was such a tangle to bead!  The beadwork decided to be such a tangle that it was an absolute horror to bead and took about four decreasing rounds (and an obliging can!) for it to become round and bangle shaped.
 I also decided to add in an Elegant Guide Round (video) that Kate McKinnon came up with, which I hadn't played with before.  Even though I didn't embellish the EGR in any way, I am a definite convert to this technique and will never stitch in the ditch again!
 After I did one side with the EGR, I just suddenly lost interest.  My stitches had reopened and I just couldn't face doing any more beading for a few weeks so my amazing Mummy finished it off for me. 
 I think that going with the zigzag edges really completes the piece.  I always tend to go with straight edges or wings but I wanted to try something a little more elegant this time, lending itself to the colours (get me trying to do grown up beading!).

It is available in my Etsy Shop

Friday, 13 June 2014

Raven Star Bangle

My most recent make is a bangle that has been more therapeutic than anything I have ever made before.  As I have previously mentioned, I went into hospital to have a lump removed from my breast.  Unfortunately the wound got infected and my stitches burst, which has been rather difficult.  Luckily I have had the most amazing support from my family and my other half, they have been so superbly strong and marvellous.  All is good now, I'm just healing slowly.

I decided to take advantage of the recuperation time spent off work to make a study in form, eschewing colour and concentrating solely on what I could make the delicas do. 

Rather than make a usual start of an MRAW length that would be the smallest part of the bangle, I decided to push myself and made a zigged MRAW chain that would become both the tips of the horns and the very inside of the wings where the spines were 2mm cubes:

As I decided to do the whole bangle in gunmetal (simply because I had the most beads in that colour), each zig and zag was marked with a tie of white Nymo so that I didn't lose myself when adding in the next row.  It was huge - 174 MRAW units!

Slowly I added rows and rows of gunmetal delicas and it started to change its form, almost looking like a Zig Wing by Kate McKinnon.  Then I turned my attention to the other side and it slowly started to open up, like a flower:

The more rows I added, the more the form became apparent.  It was working!


As it opened and both sides began to have the same number of rows, it really started to lie flat and become, not what I had imagined but what it needed to be.


It is certainly big and takes no prisoners!  I can't imagine that there will be many that actually like it but that is okay, good even.  This bangle is a symbol of strength, and whoever does decide that they like it and wants it then I hope they feel as fierce and as strong as I felt when I was making it.

It is available in my Etsy shop here

EDIT: I just received the most wonderful screenshot from Kate McKinnon - it is being included in Contemporary Geometric Beadwork Volume II and I have contributed the pattern to the Pattern Library so you can make your very own!  I'm so excited!


Friday, 28 March 2014

Mummy's Crazy Psychadelic Pyramids On Acid!

You may remember my Pyramids Cuff from a while back, the pattern I gave to Kate McKinnon and was chosen to go into Contemporary Geometric Beadwork vol.1? Well, Mummy decided that she wanted to have a go at this pattern and gave it her very special spin!


First of all she tried making a pyramid that faded from dark pink at the tip to pale pink at the base but had to stop because it looked so much like a boob that I couldn't stop snorting and giggling!  Yes I am a grown up!  Clearly some colour ways just aren't good for pyramids!

Instead, she decided to have a nose through my delica stash and her eyes very quickly alighted on my duracoat galvanised delicas. The witch!  She loves bright colours and the duracoats made her squeal with delight.  Luckily she decided that the underneath of the pyramid should be a plain colour so as not to wear off the colours underneath.  She chose a simple smokey grey delica for that.


The colours must have reminded her of growing up in the 70s because she decided to set herself quite a challenging pattern of turquoise and orange spiraling out of a pink base.  Quite possibly the maddest thing I've ever seen but I blooming love it!  The crazy pattern with the crazy colours just work and can't help but make you feel as though it's a bright summer's day and the sun is shining and all is groovy with the world!
As you can see, she chose some bright Swarovski rounds in turquoise to join up the pyramids, with an orange delica between the two.  Her pyramids are a lot smaller than mine and a lot busier so she wanted to leave a bit more of a gap between them and I think it really works!


And finally she decided that a square base for the clasp would work a lot better than the triangle that I made. 

I love it!  Crazy and happy and all round mental.  FANTASTIC!

Wednesday, 19 March 2014

Seeing Stars Necklace by Mummy

Mummy has done something rather glorious and unbelievably glamorous, not to mention quite technically difficult!


How astounding is that?!  Each of those stars is made in tiny size 15s!

First of all she played around with all different ways to make the stars and settled on a peyote tube that's zipped up on the outer edge once finishing.  To be honest, I really don't know how she has the patience because even though it took her a good few weeks to get the star pattern right with all the increases and decreases, she never lost sight of what she wanted to achieve.  I must admit that I would probably have used an MRAW start for the inside and tried to figure it out from there but she wanted all peyote - crazy lady!!!


After a while she gave me the pattern to have a try with as she wanted to see how easy the pattern was.  I gave it a go in delicas and although it was okay, it just wasn't as good as in Czech seed beads.  Even Japanese seeds were a bit too square for this pattern whereas the Czech doughnut shaped beads worked a treat.  Mummy made up the pattern in all different sized beads (including 6, which was mental!) and we both decided that 15s were just beyond perfection.  Then it was time to try different sizes.  Who says a maths degree isn't worth it?!  Goodness knows how she did it, but she put that mathematical weirdness in her brain to work and out came the formula for all different sized stars!


She decided that she didn't want to go for the silver/grey type usual star colours, rather leaning towards earthy tones for this necklace, so we went through our respective stashes (and did a bit of shopping!) and came up with a bunch of colours that she wanted to use.  That's one of the things I love about my Mummy, I would have either gone for silvers and sparkles or really acidic opaques but Mummy decides browns, blues and greens are the way forward.  With stars.  Bonkers.  Perfect.


I love it beyond loving it (and wish it was mine!).  Even though it's a big looking necklace, it weighs less than a whisper and doesn't jab or prickle or irritate in any way.  I've been told that if I want one I have to make it myself though.

Bah!

Sunday, 12 May 2013

Double Layer Rick Rack

It's been aaages since I last blogged.  Probably because it's taken me a good long while to make my newest bracelet!

As you know, Kate McKinnon recently released the amazing Contemporary Geometric Beadwork, an absolutely astounding book which I reviewed here and which you can buy here (USA) and here (UK).  I loved the zigged MRAW band so much, and after seeing Jean Power's absolutely exquisite Double Rick Rack in her book, Geometric Beadwork, which I reviewed here, and I just knew I needed to put the two together!  Jean shows how to do a flat Rick Rack, which is what I wanted to make, rather than a bangle.  I wanted this cuff to sit close to the wrist and her method of turning was so elegantly simple that I was quite frankly blown away!

I decided I wanted to use a black opaque background and then use a really bonkers mix of galvanised delicas.  I literally got all the duracoats  I had in my stash and mixed a great big dollop of beads (which I'm really not looking forward to separating out again).

Here I am after only a few rows of beadwork on each side.  Using the zigged band was fantastic because it meant that the sizing was pretty accurate even after just making that. I was a bit dippy doing all of the MRAW in opaque black though - when I was joining the two layers at the end, it sent me quite cross-eyed trying to follow where I was!

I had a hell of a time doing both layers together though, the thread wanted to wrap itself around all those gorgeous points pretty much every stitch I made.  I really ought to figure out a better way of keeping my thread out the way!

In this picture you can see that the top open layer just wanted to go every which way! 

And then I was done - finally!  The bracelet from the back looks quite dull in this photo but in real life you can really see how the beads change direction and the difference in the way the light behaves off their surface.  I like that this bracelet could be worn this way, as although it doesn't really pop with colour, the direction changes and the overall thickness gives it quite the impact.

I sewed through the turn beads on the ends and all I did was attach jump rings and a slide catch.  To be honest I may change the jumps to something slightly smaller so it sits a tiny touch tighter on my wrist but they were all I had to hand when I was finishing up this evening.

And  here is the finished bracelet, face on.  Hope you like it.

Tuesday, 20 November 2012

Red Many-Horn

As you will know if you read my blog, Kate McKinnon is curating a new book called Contemporary Geometric Beadwork (buy it here) that is a sister to Jean Power's absolutely incredible Geometric Beadwork (yes, I will be talking about that in my next post!) 

Kate has invited beaders all over the world, of all abilities, to get inspiration from the pictures she's posting and has given people who have pre-ordered heads up on various techniques and designs and then send her pictures for the book/eBook/website/facebook.  After seeing the Horned Melon by Kate I was fizzing with inspiration and absolutely itching to do a rendition in shades of red.

I started with the M-RAW bangle base that Kate gave pre-orders and decided that I would have seven horns to start with.

As the horns got bigger and bigger, the cuff just wanted to twist and bend and fall down into odd squares.  This, for me was utterly exciting because I didn't know how far these structures could be pushed before they became unfeasable...

After 25 rows on one side of the horn, I was worried about whether I would have enough silver lined red delicas rather than being worried that the horns would become unstable.  I'm quite a tight beader and definitely think 50 rows per horn side is achievable, if a little impractical for a cuff!

I started to decrease but for the first few rows, the cuff showed absolutely no signs of behaving and turning into an actual cuff rather than a beaded 'form'!

However, a few more rows and a little manipulation and the cuff started to take shape.  

I made the opening of the cuff 14 beads larger on this side by decreasing down 24 rows rather than 25 as I knew that it would end up being quite a large cuff and that a bit of forearm would need to be accommodated!  There's nothing worse than a gorgeous cuff that only skeletons can wear because it's too small!

In this picture you can see that I'm beginning to add a row of RAW so that the cuff is symmetric:

And then I started to make some wings using colour lined chocolate cherry delicas.  Well, at least when I started they were going to be wings!

In this picture you can see that I made the darker red wings/horn beginnings start their shape right in the centre between the large horn.  This is because the original idea was to make two sides of wings and join them at the point row in the same way as I did the Pink Pinstripe Ruffle Cuff...


But they wanted to be horns as well!  These horns are 14 rows per side (I think!), so that they don't stick out as much as the bright red horns.


I edged the opening with two rows of the silver lined red to give it a bit of a more polished finish.  And then  started again on the other side...


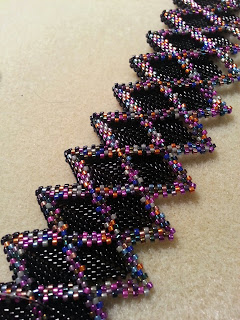
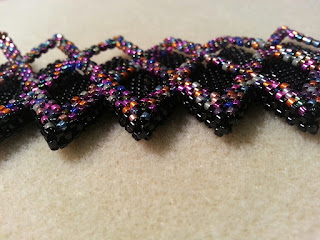
All finished!  Please excuse the rather rubbish pictures - I took them the evening I finished it and it was about 11 o' clock at night! 


All in all, it is a truly vicious cuff that makes me think of warrior queens and Japanese anime characters and superheroes all in one!  I love how BIG it is and how spiky it is and above all, I love the colours.

UPDATE: Someone asked in the comments what this cuff looks like on.  Unfortunately I don't have a picture of me wearing it but I do have a picture of my son, Xander, wearing it!  Yes, it clashes with his top but he said he felt like a superhero so I let him wear it for a bit :)

Friday, 12 October 2012

Circle Starburst


I'll be moving house soon so I thought I'd have a bit of a sort through of all my patterns and my beading stash.  I'm off work at the moment with an ear infection (not so much fun when you're deaf!) so now is the perfect time to have a root through and see what I've got.

A long time ago I bought the pattern for the Circle Starburst by the amazing Cindy Holsclaw.  I bought some 6mm Swarovski pendants to make it and then promptly forgot all about it, filing the pattern and stashing the crystals! 

I thought I'd pick up a needle and thread and start making it.  The pattern is pretty simple and if you've made a beaded bead using the Bead Infinitum's Infinity Weave then you're on to a winner!  However, if you're not used to following 3D patterns presented on a 2D plane then get something a lot simpler!  This isn't really a pattern for a beginner.

Here is the beaded bead with wide open spaces.  Quite honestly, I wish I'd had a black support bead because I think this looks lovely!

This is the beaded bead from the triple crystal view:

 All finished, from the five crystal view:

Admittedly, I did simplify the pattern.  In the actual pattern the seed beads come up in small volcano type shapes in between the pendants but I felt that they hid the beautiful Swarovski crystal too much for my taste.  I took off all the volcanoes and adapted the pattern so that the pendants really stick out of the seed bead base.  It makes it look a lot more spiky and a bit more vicious, but that's what I like in jewellery anyways!

To hang it on the silver neck wire, I simply popped an eye pin through the beaded bead, trimmed and turned a loop.

Close up of the beaded bead on the neck wire:

In all, it's quite a nifty little beaded bead that could be used as a base for lots of different variations.  Make sure you have lots of finer needles to hand though - I got through three needles because you have to get into some quite tight spaces!  I think the price is a little steep for what you get - $36 which equates to roughly £22...   But it is pretty.

Hope you like it!

Sunday, 2 September 2012

Heroine Necklace

So all summer I have been working on Jean Power's amazing Heroine Necklace.  The pattern came out in the August/September issue of Beadwork Magazine and as soon as I saw it I fell utterly in love with it and knew I needed to make one for myself!

Here is my attempt:

 The triangle chain was so easy to do - repetitive but easy!  The clasp is a rather remarkable design that is fully reversible so that you can have two totally different looks in one necklace.  On this side I found a gorgeous vintage German pressed glass cabochon that had triangular facets which I just loved as it echoed the triangle link chain.


Here's a close up of the chain:


On the other side of the clasp, I decided to use a titanium coated agate druzy.  I wanted something that looked really industrial but organic and thus completely at odds but in harmony with the rigidity of the steel triangles.  I think it works! 

Side view:


The colour of the druzy really lightens the steel in comparison with the black glass cab.

In all, this has been a mammoth project, and definitely not a hill I'll be scaling anytime soon again!  All the effort, and 100g of steel delicas is definitely worth it though as I think it looks amazing.  Jean made such a clever clasp and the fact that you can wear it without the clasp and tie it together with ribbon just adds to the versatility.  I love this necklace and thanks to Jean for such an amazing pattern!

Sunday, 8 July 2012

Key To My Heart by Jean Power

The rather marvellous Jean Power recently released a pattern called Key To My Heart and Mummy and I immediately adored it so we decided to set ourselves a little challenge.  We would both bead it together and see how differently we interpreted the uses for these gorgeous little trinkets.

We'll see Mummy's use first:

Mummy chose to make a rather delicious necklace using both keys and the padlock as a centre piece.  As you can see, she used her favourite blue for the detail colours and it looks rather fabulous!

Here's a close up of the centre piece with both keys on the simple peyote chain - she wanted the keys and the padlock to really stand out with this and she has definitely achieved that.

Mummy chose to have the keys come off if she wanted something a little bit simpler.  I love this with the padlock alone because it looks so Sid Vicious!!!  This is how I'd wear it :) 

This is what she said about the pattern and how she got on with it:

"Hello dear, doing my duty for you... The keys were very easy to make, the instructions were very clear.  I also made one more with peyote and less brick and, though I think it looks nicer, it is not as robust.


The padlock I found more difficult for some reason... It wasn't until I had made it/remade it for the 4th time that I really felt comfortable about the shaping - as you said, I was probably over analysing it with my mathematical brain - possibly if the diagrams had shown how the shape began to form I might have found it easier (being a visual learner!).  Once I was comfy with it, it was no problem.  I think I also changed the beads I used to more delicas than in the pattern but I can't remember - you've got it Cate, so you can look!"

This is how I used them:

As you can see, I decided on a much darker colour choice - I love gunmetal and red, the black beads helped to darken the Swarovski rivoli from the much brighter red that you can see in this blog post, taking it to a much bloodier red. 

I also thought that the components really lent themselves to be a fabulous pair of same-but-not-the-same earrings.  I never wear earrings that match - I even have one piercing in my left ear and six in my right ear because I dislike matching so much!  For me, odd but paired earrings really work, and Jean's fabulous pattern was a simple but effective way to make them.

As for interpreting the pattern, I found that a breeze.  Where Mummy had issues with making the padlock, I had none.  This is probably because I just sit back and put my brain in neutral when beading up a pattern and trust implicitly that all the steps are correct and the design will suddenly emerge in the way the designer wanted!  Mummy, on the other hand, is a much more inquisitive beader, analysing every step and second-guessing all the missed stitches and additional stitches and seeing how the designer created the form. 

In the end, the padlock took me one evening and the key took another evening so they were pretty quick makes. 

What makes this pattern such a bargain (seriously, a measly six squiddlies - or £6 if you don't work in squiddlies!) is the fact that the components are so versatile.  I immediately though of mismatched earrings, Mummy wanted a necklace that could be worn three ways.  There are loads of other things you could so with these pieces - what about beading a load of them and adding them to fat chunky chain to make a superbly chunky charm bracelet?  Changing the rivoli sizes and making a hugely oversized key pendant on a long necklace?  Turning the rivoli key on the horizontal, adding a peyote shank and making a bling ring? Having a deliciously long lariat end in a padlock on one end and a key on the other?  Seriously, the list is endless!  Go get this pattern!