I had the urge recently to make a bracelet using Jean Power's Geometric 3-4-4 pattern that comes with the Geometric Series Set. I decided to go way out of my comfort zone and use gold and white - not a colour combination I have ever used before! I went for plain white opaque and then the gold duracoat delicas to add some seriously decadent glamour!
This is the finished product:
It starts with the first triangle... Here I needed some second opinions of the white and gold combination, which I showed to pretty much everybody! I didn't want the colour combo to be dull, just chic - not something I'm used to having to think about with my usual work!!
Once I'd made two of the power puffs, it was back out for more opinions. I really wasn't confident with my colour choices because these are two colours I hardly ever go to.
Slowly the bracelet grew...
...and grew some more
After a good 30g of beads and two weeks of work, this gorgeous bracelet was finished! As you can see, I made it into a bracelet with a magnetic clasp as I wanted it to sit closer to the wrist than a bangle would.
The clasp is pretty well camouflaged by the power puffs, which I'm pleased about as I didn't want it to be conspicuous or dramatically take away from the gorgeous design that Jean has given us.
This photo shows how the bracelet looks on with the gold triangles pointed outwards. I think I prefer it this way for some reason - don't know why though!
So there it is, my latest make. Hope you like it.
It is available in my etsy shop.
Endless drivel on my love affair with beads. With pictures - does that make it okay?
Showing posts with label bracelet. Show all posts
Saturday, 2 May 2015
Friday, 20 March 2015
Golden Chocolate Rick Rack Bracelet
Oh my goodness it's been a while! I didn't quite realise just how long it had been though! Ooops...
Anyways, I have been incredibly busy with my needle, thread, beads and a smattering of Swarovski rivolis and am pleased to show you my latest bracelet:
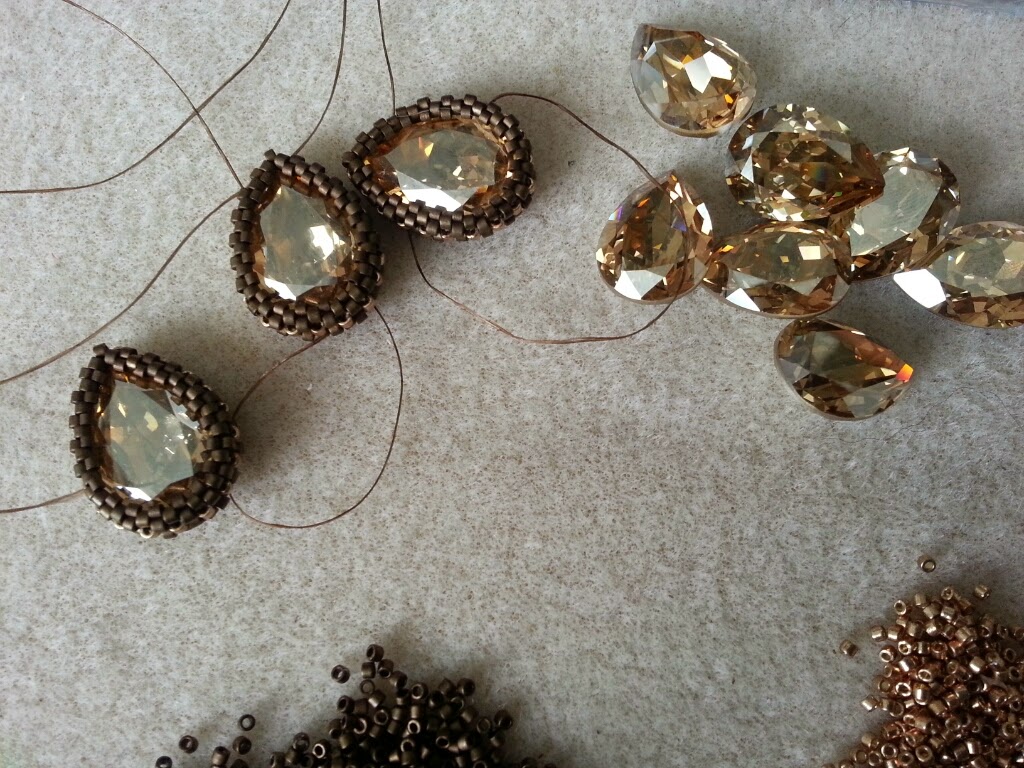
I used MRAW to bezel the Swarovski crystals (I used 18x13mm Pear Fancy Stones in Golden Shadow), which was surprisingly easy on the hands. The stones didn't pop out or misbehave in any way whist I was beading - highly recommend using this method of bezelling!
I used delicas in Dark Bronze Matte and Galvanised Light Champagne Duracoat for the front. I used the champagne for the ladders in the MRAW on the stones so decided to echo that in the main bracelet as well and then do a zigzag stripe of the gold to really draw those crystals into the design as a whole.
I've also finished another bangle that's along these lines but a teeny touch more bonkers - I'll blog it soon!
Anyways, I have been incredibly busy with my needle, thread, beads and a smattering of Swarovski rivolis and am pleased to show you my latest bracelet:
As you can see, I used Jean Power's amazing Rick Rack pattern, started off by using the incredible Contemporary Geometric Beadwork MRAW start. As this isn't the first Rick Rack bracelet I've done, I also made the Double Layer Rick Rack bracelet last year, I noticed that those delicious v shapes could be perfectly filled using Swarovski pear shaped crystals. This got me thinking....
I used MRAW to bezel the Swarovski crystals (I used 18x13mm Pear Fancy Stones in Golden Shadow), which was surprisingly easy on the hands. The stones didn't pop out or misbehave in any way whist I was beading - highly recommend using this method of bezelling!
I used delicas in Dark Bronze Matte and Galvanised Light Champagne Duracoat for the front. I used the champagne for the ladders in the MRAW on the stones so decided to echo that in the main bracelet as well and then do a zigzag stripe of the gold to really draw those crystals into the design as a whole.
As you can see in this shot, the bracelet is double layered. It could work single layered but I think that because I decided to use the bigger crystals, the body needed to be much more sturdy than a single layer. I'm a tight beader and even one layer of rick rack is pretty strong but I really didn't want this bad boy to buckle over time with lots of wear! The reverse of the bracelet is just plain matte dark bronze as there was no need for there to be any ornamentation as it generally won't be seen.
It was finished with a simple gold slide clasp, the loops of which were securely attached and hidden inside the bracelet to give it a fully finished and sleek look.
I must admit that I'm really proud of how well this bracelet turned out. It sits really closely to the wrist (well, mine anyway!) and looks quite chic and elegant - not my usual style at all! It is exactly what I imagined when I first put needle and thread to beads - that never happens! I hope you like it too.
Labels:
beading,
beads,
bracelet,
Cindy Holsclaw,
colour,
Contemporary Geometric Beadwork,
crystals,
cuff,
delicas,
etsy,
Geometric Beadwork,
geometry,
Jean Power,
Kate McKinnon,
Modified RAW,
peyote,
statement,
Swarovski
Sunday, 25 May 2014
Mummy's Shape Up Bracelet
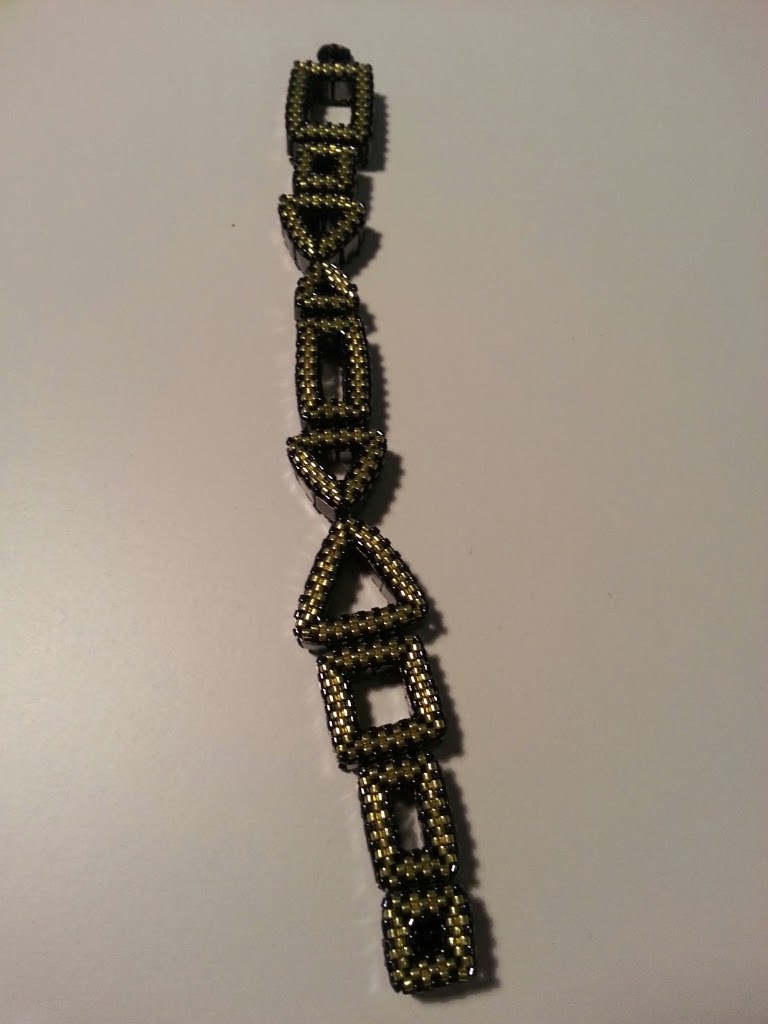
Mummy has been at it again... She has been playing with Tila Beads and decided to see if she could use them as the MRAW start to make all sorts of chunky different shapes. Once she'd made a handful she decided to sew them all together and voila, a gorgeous Shape Up bracelet!
The bracelet below is the original gold and gunmetal design that she used. Not colours I'd ever put together but my goodness it works!
Here you can see all the shapes laid out and how deftly put together they are. This bracelet is delicate but chunky. It doesn't slide, just sits close to the wrist and the look totally depends upon which of the elements you have showing. It's a very comfortable bracelet and doesn't interfere with anything you're doing.
Then the cheeky minx that is Mummy decided to have a rummage through my opaques because she decided that where the gold and gunmetal was elegant and grown up, bright keleidoscopic colours would turn the same bracelet into something entirely different! And doesn't it just?! It's playful and fun and I love this so much more than the gold one above. It's reminiscent of Liquorice Allsorts (yummy!) and that makes me think of happy summer days playing in the garden when I was little.
In this final picture below you can see how Mummy has used a dressmaker's popper for the closure. A simple little tab for one half and the other half sewn to a baby square. So lovely and so seamless when on.
The bracelet below is the original gold and gunmetal design that she used. Not colours I'd ever put together but my goodness it works!
Here you can see all the shapes laid out and how deftly put together they are. This bracelet is delicate but chunky. It doesn't slide, just sits close to the wrist and the look totally depends upon which of the elements you have showing. It's a very comfortable bracelet and doesn't interfere with anything you're doing.
Then the cheeky minx that is Mummy decided to have a rummage through my opaques because she decided that where the gold and gunmetal was elegant and grown up, bright keleidoscopic colours would turn the same bracelet into something entirely different! And doesn't it just?! It's playful and fun and I love this so much more than the gold one above. It's reminiscent of Liquorice Allsorts (yummy!) and that makes me think of happy summer days playing in the garden when I was little.
In this final picture below you can see how Mummy has used a dressmaker's popper for the closure. A simple little tab for one half and the other half sewn to a baby square. So lovely and so seamless when on.
Labels:
beading,
bracelet,
colour,
delicas,
geometry,
Jean Power,
Kate McKinnon,
Modified RAW,
Mummy,
palette,
pattern,
peyote,
repetition
Friday, 28 March 2014
Mummy's Crazy Psychadelic Pyramids On Acid!
You may remember my Pyramids Cuff from a while back, the pattern I gave to Kate McKinnon and was chosen to go into Contemporary Geometric Beadwork vol.1? Well, Mummy decided that she wanted to have a go at this pattern and gave it her very special spin!
First of all she tried making a pyramid that faded from dark pink at the tip to pale pink at the base but had to stop because it looked so much like a boob that I couldn't stop snorting and giggling! Yes I am a grown up! Clearly some colour ways just aren't good for pyramids!
Instead, she decided to have a nose through my delica stash and her eyes very quickly alighted on my duracoat galvanised delicas. The witch! She loves bright colours and the duracoats made her squeal with delight. Luckily she decided that the underneath of the pyramid should be a plain colour so as not to wear off the colours underneath. She chose a simple smokey grey delica for that.
The colours must have reminded her of growing up in the 70s because she decided to set herself quite a challenging pattern of turquoise and orange spiraling out of a pink base. Quite possibly the maddest thing I've ever seen but I blooming love it! The crazy pattern with the crazy colours just work and can't help but make you feel as though it's a bright summer's day and the sun is shining and all is groovy with the world!
As you can see, she chose some bright Swarovski rounds in turquoise to join up the pyramids, with an orange delica between the two. Her pyramids are a lot smaller than mine and a lot busier so she wanted to leave a bit more of a gap between them and I think it really works!
And finally she decided that a square base for the clasp would work a lot better than the triangle that I made.
I love it! Crazy and happy and all round mental. FANTASTIC!
First of all she tried making a pyramid that faded from dark pink at the tip to pale pink at the base but had to stop because it looked so much like a boob that I couldn't stop snorting and giggling! Yes I am a grown up! Clearly some colour ways just aren't good for pyramids!
Instead, she decided to have a nose through my delica stash and her eyes very quickly alighted on my duracoat galvanised delicas. The witch! She loves bright colours and the duracoats made her squeal with delight. Luckily she decided that the underneath of the pyramid should be a plain colour so as not to wear off the colours underneath. She chose a simple smokey grey delica for that.
The colours must have reminded her of growing up in the 70s because she decided to set herself quite a challenging pattern of turquoise and orange spiraling out of a pink base. Quite possibly the maddest thing I've ever seen but I blooming love it! The crazy pattern with the crazy colours just work and can't help but make you feel as though it's a bright summer's day and the sun is shining and all is groovy with the world!
As you can see, she chose some bright Swarovski rounds in turquoise to join up the pyramids, with an orange delica between the two. Her pyramids are a lot smaller than mine and a lot busier so she wanted to leave a bit more of a gap between them and I think it really works!
And finally she decided that a square base for the clasp would work a lot better than the triangle that I made.
I love it! Crazy and happy and all round mental. FANTASTIC!
Labels:
beaded bead,
beading,
book,
bracelet,
challenge,
colour,
Contemporary Geometric Beadwork vol 1,
crystals,
delicas,
geometry,
inspiration,
Jean Power,
Kate McKinnon,
Mummy,
palette,
pattern,
peyote,
repetition
Friday, 14 March 2014
Sabine Lippert's La Fleur Bracelet
I've done a Sabine Lippert pattern before (her Sweet Hearts pattern - these earrings beaded by Mummy) and found them easy to read and thought I'd give myself a bit of a challenge for a Christmas gift for one of my staff. After much deliberation (and I mean lots - Staff 3 is a delicate young thing and is girly in ways that I'm just not so this was a massive challeng!) I decided upon Sabine's La Fleur Bracelet (found in her book Beaded Fantasies). As I've never really made anything like this, and Staff 3 is a delicately coloured redhead I played it safe and used turquoise and bronze as the colourway.
The bracelet is made up of these darling little flowers made with 8mm Swarovski chatons (an absolute bugger to source in this country!) and tiny 3mm Swarovski bicones, with mainly size 15 seed beads! I've put a 50p next to the flower so you can see how small these blighters really are!
I made what seemed like a bazillion of the flowers - each one with thread left on, as you can see in the picture, with which you do the most sublime links with (Sabine really does take care that even the bits of the work you don't see are as beautiful as the bits you do).
Then it came to joining them together and working out if I needed to do another flower or if it was long enough. The pattern calls for 9 flowers (if I remember correctly), but Staff 3 is a tiny little thing so she needed only 8 flowers. Which is a good thing as I'm not much of a component maker - I get bored!
The finished bracelet.
All in all, it was a nice make. Not difficult by any stretch of the imagination, just blooming fiddly! I think I got through 2 or 3 needles per flower, and definitely needed my pliers on more than one occasion for pulling the needle through. It was a complete change of direction for me, the instructions were clear and concise and Sabine explains things very simply. It's not something I would wear, but I think it looks lovely on Staff 3 and I know that she likes it, which is what is important in a gift after all! I did buy another colour of chatons and matching bicones that would go with steel/gunmetal seed beads but I think it'll be a long old while before I make this pattern again. Life is far too short to repeat the same patterns when there are so many to try, as well as so many ideas in my own head!
The bracelet is made up of these darling little flowers made with 8mm Swarovski chatons (an absolute bugger to source in this country!) and tiny 3mm Swarovski bicones, with mainly size 15 seed beads! I've put a 50p next to the flower so you can see how small these blighters really are!
I made what seemed like a bazillion of the flowers - each one with thread left on, as you can see in the picture, with which you do the most sublime links with (Sabine really does take care that even the bits of the work you don't see are as beautiful as the bits you do).
Then it came to joining them together and working out if I needed to do another flower or if it was long enough. The pattern calls for 9 flowers (if I remember correctly), but Staff 3 is a tiny little thing so she needed only 8 flowers. Which is a good thing as I'm not much of a component maker - I get bored!
The finished bracelet.
All in all, it was a nice make. Not difficult by any stretch of the imagination, just blooming fiddly! I think I got through 2 or 3 needles per flower, and definitely needed my pliers on more than one occasion for pulling the needle through. It was a complete change of direction for me, the instructions were clear and concise and Sabine explains things very simply. It's not something I would wear, but I think it looks lovely on Staff 3 and I know that she likes it, which is what is important in a gift after all! I did buy another colour of chatons and matching bicones that would go with steel/gunmetal seed beads but I think it'll be a long old while before I make this pattern again. Life is far too short to repeat the same patterns when there are so many to try, as well as so many ideas in my own head!
Sunday, 12 May 2013
Double Layer Rick Rack
It's been aaages since I last blogged. Probably because it's taken me a good long while to make my newest bracelet!
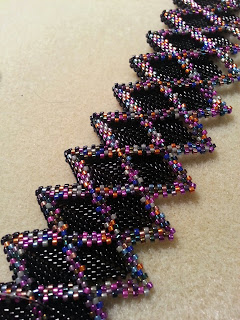
As you know, Kate McKinnon recently released the amazing Contemporary Geometric Beadwork, an absolutely astounding book which I reviewed here and which you can buy here (USA) and here (UK). I loved the zigged MRAW band so much, and after seeing Jean Power's absolutely exquisite Double Rick Rack in her book, Geometric Beadwork, which I reviewed here, and I just knew I needed to put the two together! Jean shows how to do a flat Rick Rack, which is what I wanted to make, rather than a bangle. I wanted this cuff to sit close to the wrist and her method of turning was so elegantly simple that I was quite frankly blown away!
I decided I wanted to use a black opaque background and then use a really bonkers mix of galvanised delicas. I literally got all the duracoats I had in my stash and mixed a great big dollop of beads (which I'm really not looking forward to separating out again).
Here I am after only a few rows of beadwork on each side. Using the zigged band was fantastic because it meant that the sizing was pretty accurate even after just making that. I was a bit dippy doing all of the MRAW in opaque black though - when I was joining the two layers at the end, it sent me quite cross-eyed trying to follow where I was!
I had a hell of a time doing both layers together though, the thread wanted to wrap itself around all those gorgeous points pretty much every stitch I made. I really ought to figure out a better way of keeping my thread out the way!
In this picture you can see that the top open layer just wanted to go every which way!
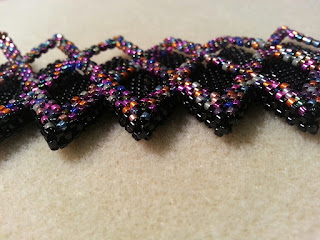
And then I was done - finally! The bracelet from the back looks quite dull in this photo but in real life you can really see how the beads change direction and the difference in the way the light behaves off their surface. I like that this bracelet could be worn this way, as although it doesn't really pop with colour, the direction changes and the overall thickness gives it quite the impact.
I sewed through the turn beads on the ends and all I did was attach jump rings and a slide catch. To be honest I may change the jumps to something slightly smaller so it sits a tiny touch tighter on my wrist but they were all I had to hand when I was finishing up this evening.
And here is the finished bracelet, face on. Hope you like it.
As you know, Kate McKinnon recently released the amazing Contemporary Geometric Beadwork, an absolutely astounding book which I reviewed here and which you can buy here (USA) and here (UK). I loved the zigged MRAW band so much, and after seeing Jean Power's absolutely exquisite Double Rick Rack in her book, Geometric Beadwork, which I reviewed here, and I just knew I needed to put the two together! Jean shows how to do a flat Rick Rack, which is what I wanted to make, rather than a bangle. I wanted this cuff to sit close to the wrist and her method of turning was so elegantly simple that I was quite frankly blown away!
I decided I wanted to use a black opaque background and then use a really bonkers mix of galvanised delicas. I literally got all the duracoats I had in my stash and mixed a great big dollop of beads (which I'm really not looking forward to separating out again).
Here I am after only a few rows of beadwork on each side. Using the zigged band was fantastic because it meant that the sizing was pretty accurate even after just making that. I was a bit dippy doing all of the MRAW in opaque black though - when I was joining the two layers at the end, it sent me quite cross-eyed trying to follow where I was!
I had a hell of a time doing both layers together though, the thread wanted to wrap itself around all those gorgeous points pretty much every stitch I made. I really ought to figure out a better way of keeping my thread out the way!
In this picture you can see that the top open layer just wanted to go every which way!
And then I was done - finally! The bracelet from the back looks quite dull in this photo but in real life you can really see how the beads change direction and the difference in the way the light behaves off their surface. I like that this bracelet could be worn this way, as although it doesn't really pop with colour, the direction changes and the overall thickness gives it quite the impact.
I sewed through the turn beads on the ends and all I did was attach jump rings and a slide catch. To be honest I may change the jumps to something slightly smaller so it sits a tiny touch tighter on my wrist but they were all I had to hand when I was finishing up this evening.
And here is the finished bracelet, face on. Hope you like it.
Labels:
beading,
book,
bracelet,
challenge,
colour,
Contemporary Geometric Beadwork vol 1,
delicas,
Geometric Beadwork,
geometry,
inspiration,
Jean Power,
Kate McKinnon,
Modified RAW,
peyote,
repetition
Wednesday, 27 March 2013
Rainbow Jester Bangle
So this is my most recent make:
It is pretty much the only thing that I've been working on since I moved into my new home. I wanted something bright and a little bit bonkers to reflect the celebratory mood I have been in since we moved here! I also wanted to try to tackle my fear of using lots of colours. I have seen so many amazing pieces on the Contemporary Geometric Beadwork Facebook page that take full advantage of clever use of colour that I thought it was about time I jumped in and joined the joy!
As you can see, I went for easy colour choice because I know my limits and didn't want to end up spending weeks making something that I hated! I will get there though!
I adore the black and white stripes that almost look like they could be Square Stitch - they're not, everything but the MRAW bellybands are made using peyote.
I'm super glad I used some black magatamas to finish the horns off - they made me chuckle to myself because they change the look of the horns from quite aggressive looking (as in the Red Many Horn) into chipper, playful peaks.
The spots of colour, however, are my absolute favourite part of this bangle. Yes they may just be a tiny part of it, but they really do join the wings, the stripes and the horns together into a whole. I think if I'd left the wings plain black (which I was very close to doing) then it would have felt much more disjointed and possibly would have lost it's playfulness. Playful happiness is what I needed this piece to be - it's a celebration after all!
It is pretty much the only thing that I've been working on since I moved into my new home. I wanted something bright and a little bit bonkers to reflect the celebratory mood I have been in since we moved here! I also wanted to try to tackle my fear of using lots of colours. I have seen so many amazing pieces on the Contemporary Geometric Beadwork Facebook page that take full advantage of clever use of colour that I thought it was about time I jumped in and joined the joy!
As you can see, I went for easy colour choice because I know my limits and didn't want to end up spending weeks making something that I hated! I will get there though!
I adore the black and white stripes that almost look like they could be Square Stitch - they're not, everything but the MRAW bellybands are made using peyote.
I'm super glad I used some black magatamas to finish the horns off - they made me chuckle to myself because they change the look of the horns from quite aggressive looking (as in the Red Many Horn) into chipper, playful peaks.
The spots of colour, however, are my absolute favourite part of this bangle. Yes they may just be a tiny part of it, but they really do join the wings, the stripes and the horns together into a whole. I think if I'd left the wings plain black (which I was very close to doing) then it would have felt much more disjointed and possibly would have lost it's playfulness. Playful happiness is what I needed this piece to be - it's a celebration after all!
Labels:
bangle,
beading,
book,
bracelet,
colour,
Contemporary Geometric Beadwork vol 1,
delicas,
geometry,
inspiration,
Kate McKinnon,
Modified RAW,
muse,
new house,
palette,
peyote,
repetition
Sunday, 24 March 2013
Mummy's Night Sky
For Christmas Mummy asked my baby brother for the Night Sky pattern from BeAdInfinitum and he surprised her by buying her the kit.
She made the weave slightly thinner than the one in the pattern that came with the kit because she really didn't want it to be tied with a ribbon, corset style, because she knew that would just annoy her whilst typing/working etc.
Instead she made a gorgeous little toggle closure that fits perfectly in the holes of the weave. As she is a complete genius, this means that the bracelet is adjustable and we can share! Woop! (Not sure whether she realises she's sharing just yet though!)
In this last picture you can really see the nature of the weave. It's a subtle play on size and colour contrast and I absolutely love it.
She made the weave slightly thinner than the one in the pattern that came with the kit because she really didn't want it to be tied with a ribbon, corset style, because she knew that would just annoy her whilst typing/working etc.
Instead she made a gorgeous little toggle closure that fits perfectly in the holes of the weave. As she is a complete genius, this means that the bracelet is adjustable and we can share! Woop! (Not sure whether she realises she's sharing just yet though!)
Labels:
beadinfinitum,
beading,
beads,
bracelet,
palette,
pattern,
seed beads
Tuesday, 20 November 2012
Red Many-Horn
As you will know if you read my blog, Kate McKinnon is curating a new book called Contemporary Geometric Beadwork (buy it here) that is a sister to Jean Power's absolutely incredible Geometric Beadwork (yes, I will be talking about that in my next post!)
Kate has invited beaders all over the world, of all abilities, to get inspiration from the pictures she's posting and has given people who have pre-ordered heads up on various techniques and designs and then send her pictures for the book/eBook/website/facebook. After seeing the Horned Melon by Kate I was fizzing with inspiration and absolutely itching to do a rendition in shades of red.
I started with the M-RAW bangle base that Kate gave pre-orders and decided that I would have seven horns to start with.
As the horns got bigger and bigger, the cuff just wanted to twist and bend and fall down into odd squares. This, for me was utterly exciting because I didn't know how far these structures could be pushed before they became unfeasable...
After 25 rows on one side of the horn, I was worried about whether I would have enough silver lined red delicas rather than being worried that the horns would become unstable. I'm quite a tight beader and definitely think 50 rows per horn side is achievable, if a little impractical for a cuff!
I started to decrease but for the first few rows, the cuff showed absolutely no signs of behaving and turning into an actual cuff rather than a beaded 'form'!
However, a few more rows and a little manipulation and the cuff started to take shape.
I made the opening of the cuff 14 beads larger on this side by decreasing down 24 rows rather than 25 as I knew that it would end up being quite a large cuff and that a bit of forearm would need to be accommodated! There's nothing worse than a gorgeous cuff that only skeletons can wear because it's too small!
In this picture you can see that I'm beginning to add a row of RAW so that the cuff is symmetric:
And then I started to make some wings using colour lined chocolate cherry delicas. Well, at least when I started they were going to be wings!
In this picture you can see that I made the darker red wings/horn beginnings start their shape right in the centre between the large horn. This is because the original idea was to make two sides of wings and join them at the point row in the same way as I did the Pink Pinstripe Ruffle Cuff...
But they wanted to be horns as well! These horns are 14 rows per side (I think!), so that they don't stick out as much as the bright red horns.
I edged the opening with two rows of the silver lined red to give it a bit of a more polished finish. And then started again on the other side...
All finished! Please excuse the rather rubbish pictures - I took them the evening I finished it and it was about 11 o' clock at night!
All in all, it is a truly vicious cuff that makes me think of warrior queens and Japanese anime characters and superheroes all in one! I love how BIG it is and how spiky it is and above all, I love the colours.
UPDATE: Someone asked in the comments what this cuff looks like on. Unfortunately I don't have a picture of me wearing it but I do have a picture of my son, Xander, wearing it! Yes, it clashes with his top but he said he felt like a superhero so I let him wear it for a bit :)
Kate has invited beaders all over the world, of all abilities, to get inspiration from the pictures she's posting and has given people who have pre-ordered heads up on various techniques and designs and then send her pictures for the book/eBook/website/facebook. After seeing the Horned Melon by Kate I was fizzing with inspiration and absolutely itching to do a rendition in shades of red.
I started with the M-RAW bangle base that Kate gave pre-orders and decided that I would have seven horns to start with.
As the horns got bigger and bigger, the cuff just wanted to twist and bend and fall down into odd squares. This, for me was utterly exciting because I didn't know how far these structures could be pushed before they became unfeasable...
After 25 rows on one side of the horn, I was worried about whether I would have enough silver lined red delicas rather than being worried that the horns would become unstable. I'm quite a tight beader and definitely think 50 rows per horn side is achievable, if a little impractical for a cuff!
I started to decrease but for the first few rows, the cuff showed absolutely no signs of behaving and turning into an actual cuff rather than a beaded 'form'!
However, a few more rows and a little manipulation and the cuff started to take shape.
I made the opening of the cuff 14 beads larger on this side by decreasing down 24 rows rather than 25 as I knew that it would end up being quite a large cuff and that a bit of forearm would need to be accommodated! There's nothing worse than a gorgeous cuff that only skeletons can wear because it's too small!
In this picture you can see that I'm beginning to add a row of RAW so that the cuff is symmetric:
And then I started to make some wings using colour lined chocolate cherry delicas. Well, at least when I started they were going to be wings!
In this picture you can see that I made the darker red wings/horn beginnings start their shape right in the centre between the large horn. This is because the original idea was to make two sides of wings and join them at the point row in the same way as I did the Pink Pinstripe Ruffle Cuff...
But they wanted to be horns as well! These horns are 14 rows per side (I think!), so that they don't stick out as much as the bright red horns.
I edged the opening with two rows of the silver lined red to give it a bit of a more polished finish. And then started again on the other side...
All finished! Please excuse the rather rubbish pictures - I took them the evening I finished it and it was about 11 o' clock at night!
All in all, it is a truly vicious cuff that makes me think of warrior queens and Japanese anime characters and superheroes all in one! I love how BIG it is and how spiky it is and above all, I love the colours.
UPDATE: Someone asked in the comments what this cuff looks like on. Unfortunately I don't have a picture of me wearing it but I do have a picture of my son, Xander, wearing it! Yes, it clashes with his top but he said he felt like a superhero so I let him wear it for a bit :)
Subscribe to:
Posts (Atom)