Well goodness me! You may remember my Pyramids Cuff, well it will soon be published in Contemporary Geometric Beadwork, a book by Kate McKinnon inspired by the ever wonderful Jean Power!! I'm absolutely chuffed to bits. An actual something I made PUBLISHED!!!
Not only that, Jean has her very own book coming out as well soon based on her beading career! I may just faint with excitement!
I cannot wait to hold both these books in my hands and pore over all the wondrousness that they will contain.
Thursday, 6 September 2012

Sunday, 2 September 2012
Heroine Necklace
So all summer I have been working on Jean Power's amazing Heroine Necklace. The pattern came out in the August/September issue of Beadwork Magazine and as soon as I saw it I fell utterly in love with it and knew I needed to make one for myself!
Here is my attempt:
 The triangle chain was so easy to do - repetitive but easy! The clasp is a rather remarkable design that is fully reversible so that you can have two totally different looks in one necklace. On this side I found a gorgeous vintage German pressed glass cabochon that had triangular facets which I just loved as it echoed the triangle link chain.

Here's a close up of the chain:

On the other side of the clasp, I decided to use a titanium coated agate druzy. I wanted something that looked really industrial but organic and thus completely at odds but in harmony with the rigidity of the steel triangles. I think it works!

Side view:

The colour of the druzy really lightens the steel in comparison with the black glass cab.

In all, this has been a mammoth project, and definitely not a hill I'll be scaling anytime soon again! All the effort, and 100g of steel delicas is definitely worth it though as I think it looks amazing. Jean made such a clever clasp and the fact that you can wear it without the clasp and tie it together with ribbon just adds to the versatility. I love this necklace and thanks to Jean for such an amazing pattern!
Here is my attempt:


Here's a close up of the chain:

On the other side of the clasp, I decided to use a titanium coated agate druzy. I wanted something that looked really industrial but organic and thus completely at odds but in harmony with the rigidity of the steel triangles. I think it works!

Side view:

The colour of the druzy really lightens the steel in comparison with the black glass cab.

In all, this has been a mammoth project, and definitely not a hill I'll be scaling anytime soon again! All the effort, and 100g of steel delicas is definitely worth it though as I think it looks amazing. Jean made such a clever clasp and the fact that you can wear it without the clasp and tie it together with ribbon just adds to the versatility. I love this necklace and thanks to Jean for such an amazing pattern!
Sunday, 8 July 2012
Key To My Heart by Jean Power
The rather marvellous Jean Power recently released a pattern called Key To My Heart and Mummy and I immediately adored it so we decided to set ourselves a little challenge. We would both bead it together and see how differently we interpreted the uses for these gorgeous little trinkets.
We'll see Mummy's use first:
 Mummy chose to make a rather delicious necklace using both keys and the padlock as a centre piece. As you can see, she used her favourite blue for the detail colours and it looks rather fabulous!
 Here's a close up of the centre piece with both keys on the simple peyote chain - she wanted the keys and the padlock to really stand out with this and she has definitely achieved that.
 Mummy chose to have the keys come off if she wanted something a little bit simpler. I love this with the padlock alone because it looks so Sid Vicious!!! This is how I'd wear it :)
 This is what she said about the pattern and how she got on with it:
"Hello dear, doing my duty for you... The keys were very easy to make, the instructions were very clear. I also made one more with peyote and less brick and, though I think it looks nicer, it is not as robust.
The padlock I found more difficult for some reason... It wasn't until I had made it/remade it for the 4th time that I really felt comfortable about the shaping - as you said, I was probably over analysing it with my mathematical brain - possibly if the diagrams had shown how the shape began to form I might have found it easier (being a visual learner!). Once I was comfy with it, it was no problem. I think I also changed the beads I used to more delicas than in the pattern but I can't remember - you've got it Cate, so you can look!"
This is how I used them:
 As you can see, I decided on a much darker colour choice - I love gunmetal and red, the black beads helped to darken the Swarovski rivoli from the much brighter red that you can see in this blog post, taking it to a much bloodier red.
 I also thought that the components really lent themselves to be a fabulous pair of same-but-not-the-same earrings. I never wear earrings that match - I even have one piercing in my left ear and six in my right ear because I dislike matching so much! For me, odd but paired earrings really work, and Jean's fabulous pattern was a simple but effective way to make them.
As for interpreting the pattern, I found that a breeze. Where Mummy had issues with making the padlock, I had none. This is probably because I just sit back and put my brain in neutral when beading up a pattern and trust implicitly that all the steps are correct and the design will suddenly emerge in the way the designer wanted! Mummy, on the other hand, is a much more inquisitive beader, analysing every step and second-guessing all the missed stitches and additional stitches and seeing how the designer created the form.
In the end, the padlock took me one evening and the key took another evening so they were pretty quick makes.
What makes this pattern such a bargain (seriously, a measly six squiddlies - or £6 if you don't work in squiddlies!) is the fact that the components are so versatile. I immediately though of mismatched earrings, Mummy wanted a necklace that could be worn three ways. There are loads of other things you could so with these pieces - what about beading a load of them and adding them to fat chunky chain to make a superbly chunky charm bracelet? Changing the rivoli sizes and making a hugely oversized key pendant on a long necklace? Turning the rivoli key on the horizontal, adding a peyote shank and making a bling ring? Having a deliciously long lariat end in a padlock on one end and a key on the other? Seriously, the list is endless! Go get this pattern!
We'll see Mummy's use first:


"Hello dear, doing my duty for you... The keys were very easy to make, the instructions were very clear. I also made one more with peyote and less brick and, though I think it looks nicer, it is not as robust.
The padlock I found more difficult for some reason... It wasn't until I had made it/remade it for the 4th time that I really felt comfortable about the shaping - as you said, I was probably over analysing it with my mathematical brain - possibly if the diagrams had shown how the shape began to form I might have found it easier (being a visual learner!). Once I was comfy with it, it was no problem. I think I also changed the beads I used to more delicas than in the pattern but I can't remember - you've got it Cate, so you can look!"
This is how I used them:


As for interpreting the pattern, I found that a breeze. Where Mummy had issues with making the padlock, I had none. This is probably because I just sit back and put my brain in neutral when beading up a pattern and trust implicitly that all the steps are correct and the design will suddenly emerge in the way the designer wanted! Mummy, on the other hand, is a much more inquisitive beader, analysing every step and second-guessing all the missed stitches and additional stitches and seeing how the designer created the form.
In the end, the padlock took me one evening and the key took another evening so they were pretty quick makes.
What makes this pattern such a bargain (seriously, a measly six squiddlies - or £6 if you don't work in squiddlies!) is the fact that the components are so versatile. I immediately though of mismatched earrings, Mummy wanted a necklace that could be worn three ways. There are loads of other things you could so with these pieces - what about beading a load of them and adding them to fat chunky chain to make a superbly chunky charm bracelet? Changing the rivoli sizes and making a hugely oversized key pendant on a long necklace? Turning the rivoli key on the horizontal, adding a peyote shank and making a bling ring? Having a deliciously long lariat end in a padlock on one end and a key on the other? Seriously, the list is endless! Go get this pattern!
Wednesday, 4 July 2012
Antidote to all that gold!!!
After making the Gold Lariat of my previous post I decided I needed a quick make that was more my taste! When Mummy and I visited the Beadworker's Guild Bead Bazaar a few weeks ago, I fell in love with this Swarovski Montana Blue Fancy Oval which I bought from the JBS Beads stand (unfortunately the stone isn't listed on her website yet which is why the first link takes you to Fire Mountain Gems). JBS Beads are based literally 10 minutes from me in Thurmaston and although she is a mail/internet order company she often hosts excellent evening shopping parties in her home where you can go along and be made very welcome with a lovely cup of tea or a glass of something else poured by her husband and feel utterly free to have a wander through her ground floor looking at and buying her full range. And it does take over the full ground floor of her house! She's very welcoming and my goodness it's best to take cash because cards can get taken to their very limit if you're not careful!
Anyway, I saw the stone and knew I needed it! I also saw these gorgeous Nickel plated steel coloured delicas (DB21) and thought they would go brilliantly. I hunted high and low for the same finish delicas in 15 but could only find Steel hex-cut from G J Beads so I decided to take the plunge and bought them. I'm really glad I did as well because the cut on the hex really sparkles and gives it some life!
As always I head towards the simple, rather than embellishing and made a bit of a bling ring. I kind of love it but have to be careful wearing it when I'm driving because it really sparkles in the sunshine and can dazzle - it's definitely safer not to wear it if it's sunny out!
Here's the ring I made, it's not a brilliant picture as it was taken on my phone in the kitchen at dusk (it's the only place there was any natural light left)!

And here it is on my finger! It's definitely a statement ring, if only for the size!

Anyway, I saw the stone and knew I needed it! I also saw these gorgeous Nickel plated steel coloured delicas (DB21) and thought they would go brilliantly. I hunted high and low for the same finish delicas in 15 but could only find Steel hex-cut from G J Beads so I decided to take the plunge and bought them. I'm really glad I did as well because the cut on the hex really sparkles and gives it some life!
As always I head towards the simple, rather than embellishing and made a bit of a bling ring. I kind of love it but have to be careful wearing it when I'm driving because it really sparkles in the sunshine and can dazzle - it's definitely safer not to wear it if it's sunny out!
Here's the ring I made, it's not a brilliant picture as it was taken on my phone in the kitchen at dusk (it's the only place there was any natural light left)!

And here it is on my finger! It's definitely a statement ring, if only for the size!

Golden lariat
So I've clearly not been around much over the past month. I've been quite busy and haven't been able to bead as much as I'd like, mainly because I had to go into hospital to have two of my wisdom teeth out. Quite frankly the break was lovely and it was absolutely delicious to have a few hours of down time in the hospital! Luckily they did it as a day patient and under general anaesthetic so I mainly spent the morning reading a book and chilling out and then the afternoon asleep! Hurrah! Mummy was an absolute star and looked after Xander, but because I was quite pants and sleepy afterwards, he was a little unsettled - autistic kids and their rigid routines eh?! Daddy also bought me ice cream and that was fantastic!
Anyways, I recently had a commission from a lady at Mummy's work to make a long lariat in gold That's the only brief I had - that it was a lariat and that it was gold! I immediately thought of Gustav Klimt and his skilled use of gold, especially in his portrait of Adele Bloch Bauer and the Tree Of Life (which incidentally, I have a print of in my hallway!). I knew that there was no way I could replicate his panache in a lariat so I decided to go back to the basics and try and use his mosaic aspect of different hues of gold.
This is the result:

In this close-up you can see how many shades of gold I used. I think I must have used pretty much every hue and finish of gold seed bead there is!

And at the bottom of the lariat, to give it some weight, I used lots of gold and amber glass beads with some goldstone thrown in as well to give it some sparkle.

Unfortunately, I'm not a major fan of gold. I don't really know why but it just doesn't feel as comfortable for me. I much prefer the coolness and understatement of silvers and steels, gold just feels too blingy to me! So there you have it, not my favourite piece by a long way but I understand the lady who wanted it was thrilled to bits with it.
Anyways, I recently had a commission from a lady at Mummy's work to make a long lariat in gold That's the only brief I had - that it was a lariat and that it was gold! I immediately thought of Gustav Klimt and his skilled use of gold, especially in his portrait of Adele Bloch Bauer and the Tree Of Life (which incidentally, I have a print of in my hallway!). I knew that there was no way I could replicate his panache in a lariat so I decided to go back to the basics and try and use his mosaic aspect of different hues of gold.
This is the result:

In this close-up you can see how many shades of gold I used. I think I must have used pretty much every hue and finish of gold seed bead there is!

And at the bottom of the lariat, to give it some weight, I used lots of gold and amber glass beads with some goldstone thrown in as well to give it some sparkle.

Unfortunately, I'm not a major fan of gold. I don't really know why but it just doesn't feel as comfortable for me. I much prefer the coolness and understatement of silvers and steels, gold just feels too blingy to me! So there you have it, not my favourite piece by a long way but I understand the lady who wanted it was thrilled to bits with it.
Monday, 28 May 2012
Jean Power's Honeycomb Bracelet
Mummy decided to have a quick make and this was the result:
 Yep, the Honeycomb Bracelet by the utterly fabulous Jean Power! I know this piece is stunningly fast and very satisfying to make, not just because it makes up so quickly, but because it can be delicate and romantic, such as the one Mummy beaded here, or it can be dramatic and dangerous in other colour schemes. I made one in deep reds with blood red large beads around the outside and it was so completely different looking to the one that Mummy made that it just shows what a chameleon pattern it really is. And and absolute bargain at only £3!!!
Shame these colours don't really suite me though!! :(


Shame these colours don't really suite me though!! :(

Wednesday, 23 May 2012
Mummy's Medallion
Another of Mummy's pieces for this post!
A few months ago, Mummy and I decided to take a bit of a road trip up to The Bead Shop in Nottingham. I needed some of the 27mm Swarovski rivolis and a couple of cosmic squares for my beading lesson and couldn't wait for the postage, Mummy wanted some drop beads to make Ayshe by the fabulous Sabine Lippert, so I took a day off work and we drove up together.
I picked up what I needed and Mummy picked up the drop beads that she needed. Unfortunately they were Indian drops so weren't quite uniform or perfect enough for the Ayshe pattern, which was a shame. However, on went her Thinking Cap and she came up with this design:

I love how it makes me think of a Bollywood Saturday Night Fever! The colours are fab and it really looks superb on.


Sunday, 20 May 2012
Fade Necklace
As my muse seems to have returned from an astonishingly long holiday I have been putting pencil to paper and needle and Nymo to beads!
Last weekend Mummy and I went to the Beadworker's Guild Bead Bazaar and spent an absolute fortune between us. It was so inspiring to see people wandering about wearing the most fabulous creations. I wore my Pyramids Cuff and received lots of compliments on it. I also saw a few really amazing kits, but at £40 they were a bit too expensive for me (although not as expensive as the Sylvia Fairhurst kit Mummy liked - a whopping £73!).
I bought some rather lovely Swarovski rivolis and this is what I made with them:

I stuck with simple (yet again!) and bezelled three Swarovski rivolis; one 27mm, one 18mm and one 14mm. I used Delica DB925 Sparkling Grey for the starting 3 rows of peyote stitch and then switched to Delica DBS041 Silver Lined Crystal 15's for the next two rows.
 You can just see the Sparkling Grey in this photo.
For the rope I decided to try something that I've often seen, but never done before. I beaded a six bead round herringbone rope and started with the sparkling grey and then faded into Delica DBC0041 Silver Lined Crystal for the front portion of the rope and then back again.
 It faded in quite well I thought. It's not as good as I've seen done elsewhere, but I'm reasonably pleased as it was my first go.
Last weekend Mummy and I went to the Beadworker's Guild Bead Bazaar and spent an absolute fortune between us. It was so inspiring to see people wandering about wearing the most fabulous creations. I wore my Pyramids Cuff and received lots of compliments on it. I also saw a few really amazing kits, but at £40 they were a bit too expensive for me (although not as expensive as the Sylvia Fairhurst kit Mummy liked - a whopping £73!).
I bought some rather lovely Swarovski rivolis and this is what I made with them:

I stuck with simple (yet again!) and bezelled three Swarovski rivolis; one 27mm, one 18mm and one 14mm. I used Delica DB925 Sparkling Grey for the starting 3 rows of peyote stitch and then switched to Delica DBS041 Silver Lined Crystal 15's for the next two rows.

For the rope I decided to try something that I've often seen, but never done before. I beaded a six bead round herringbone rope and started with the sparkling grey and then faded into Delica DBC0041 Silver Lined Crystal for the front portion of the rope and then back again.

Tuesday, 15 May 2012
Very proud teacher!
This evening was Kathy's last lesson until we start up again in September and I just wanted to post to say how proud of her I am!
When Kathy first came to me about 6 months ago she'd done a bit of stringing and had attended a couple of day courses where she learned to bezel a rivoli and add a plain bail to loop onto a necklace. She'd bought hundreds of beads, books and patterns but for some reason couldn't follow them. Since then we have learned lots of different stitches (including flat peyote!) and I said that she should find a piece that she liked but wouldn't usually dare to attempt. I wanted her to find something that she aspired to but didn't quite feel ready for. She went straight to Creating Crystal Jewellery with Swarovski by Laura McCabe as she's quite the magpie! She chose a piece that was made with a rivoli and some cosmic squares but she didn't like the spiral rope. For some reason she really dislikes the look of spiral rope so we started on the pendant and once that was done, we would look at which kind of rope she would like instead.
Here's the pendant:
 She used a volcano rivoli with volcano and light vitrail cosmic squares. She started to add the picot round the secondary squares but decided that she didn't like them and wanted it to get plainer the further away from the rivoli so that your eyes are drawn in and then out again. At first she really worried about deviating from the pattern but I said that it was excellent that she felt she could personalise it - it is an important step in learning how to design jewellery for yourself after all! (As an aside - the charlottes are actually a pale AB metallic green but look white because I was using my phone camera and no natural light!)
After much thinking of all the ropes we had learned, she decided to plump for twisted herringbone, a wise choice I thought! She did remarkably well and started off two ropes in a lesson and finished them as her homework. Today, in our last lesson until September, she did a loop and toggle closure and made sure all her ends we securely woven away and cut off.
Here's the full finished necklace:

Didn't she do fabulously?! I can't quite explain how proud of her I am, she has come such a long way in her grasp of different stitches, changing from one stitch to another and most importantly, the importance of tension!
I asked her what she was looking at doing come Autumn, and she's asked me to find a pattern made of lots of components so she can do homework. I have a design brewing in the back of my brain that I think she will like - it's lots and lots of little circles (inspired by Jean Power's Freeform Cuff but as a necklace, asymmetric and using lots of different types of circles, mainly in peyote but with the odd sparkly rivoli) so I shall let it brew a little longer and then do a few rough sketches before putting needle and thread to beads! Luckily I have 3 months to make and then write up instructions after photographing it and sending her a picture!
And yes, this is an hurrah as it seems my muse is back too! Wooop!
When Kathy first came to me about 6 months ago she'd done a bit of stringing and had attended a couple of day courses where she learned to bezel a rivoli and add a plain bail to loop onto a necklace. She'd bought hundreds of beads, books and patterns but for some reason couldn't follow them. Since then we have learned lots of different stitches (including flat peyote!) and I said that she should find a piece that she liked but wouldn't usually dare to attempt. I wanted her to find something that she aspired to but didn't quite feel ready for. She went straight to Creating Crystal Jewellery with Swarovski by Laura McCabe as she's quite the magpie! She chose a piece that was made with a rivoli and some cosmic squares but she didn't like the spiral rope. For some reason she really dislikes the look of spiral rope so we started on the pendant and once that was done, we would look at which kind of rope she would like instead.
Here's the pendant:

After much thinking of all the ropes we had learned, she decided to plump for twisted herringbone, a wise choice I thought! She did remarkably well and started off two ropes in a lesson and finished them as her homework. Today, in our last lesson until September, she did a loop and toggle closure and made sure all her ends we securely woven away and cut off.
Here's the full finished necklace:

Didn't she do fabulously?! I can't quite explain how proud of her I am, she has come such a long way in her grasp of different stitches, changing from one stitch to another and most importantly, the importance of tension!
I asked her what she was looking at doing come Autumn, and she's asked me to find a pattern made of lots of components so she can do homework. I have a design brewing in the back of my brain that I think she will like - it's lots and lots of little circles (inspired by Jean Power's Freeform Cuff but as a necklace, asymmetric and using lots of different types of circles, mainly in peyote but with the odd sparkly rivoli) so I shall let it brew a little longer and then do a few rough sketches before putting needle and thread to beads! Luckily I have 3 months to make and then write up instructions after photographing it and sending her a picture!
And yes, this is an hurrah as it seems my muse is back too! Wooop!
Monday, 14 May 2012
Eleanor by Spellbound Beads (made by Mummy)
Recently Mummy made the Eleanor Necklace by The Spellbound Bead Company and this is how it turned out:
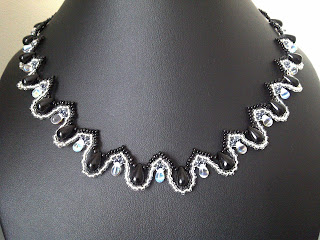
She started off making the silver on the top and the black on the bottom but it looked really odd and just didn't work so decided to flip the colours. For some reason it looks strange with the dark on the bottom yet utterly right with the dark on the top. Must be something to do with something I don't understand!
 The finished piece sits delicately on the collar bone and for such a simple project, it really does look quite elegant and sophisticated.

She started off making the silver on the top and the black on the bottom but it looked really odd and just didn't work so decided to flip the colours. For some reason it looks strange with the dark on the bottom yet utterly right with the dark on the top. Must be something to do with something I don't understand!

Monday, 7 May 2012
25th Wedding Anniversary
Last August was Mummy and Daddy's 25th wedding anniversary. They threw a fabulous party in the ballroom at The Ramada Jarvis in Leicester and it was a truly lovely evening.
To go with a fabulous deep red frock she had made, Mummy designed and made this necklace:
 It was made using two drop peyote for the neck straps, peyote flowers and leaves and lovely ladder stitched curls.
 Here you can see a close up of the flowers with the small beaded bead centres.
 And here you can see the drape of the leaves and the fabulous little curls which dripped into her cleavage and looked rather indulgent!
The main bead colours matched her dress perfectly and with a wide and deep square neckline, the asymmetry really worked well. She looked amazing and is proud of such an intricate and sentimentally important piece.
To go with a fabulous deep red frock she had made, Mummy designed and made this necklace:


The main bead colours matched her dress perfectly and with a wide and deep square neckline, the asymmetry really worked well. She looked amazing and is proud of such an intricate and sentimentally important piece.
Muse In Hiding
Well it seems my muse had been in hiding these past few weeks. I have no idea where she's gone or what she's up to but I blooming well hope she comes back soon!
Until she returns to me I have decided to post what Mummy has been making...
Until she returns to me I have decided to post what Mummy has been making...
Tuesday, 20 March 2012
Madrid and Jean Power's Faux Cro
It's been a month since I last posted because I have been so busy! I went on a trip to Madrid to see my baby brother and his lovely girlfriend which was utterly fabulous. I spent a lot of time in The Prado, mainly gasping at delight over the deliciousness that is Heironymus Bosch's The Garden Of Earthly Delights and enjoyed the newly restored Mona Lisa copy (although I don't really like it!). However, it was at Reina Sofia that my imagination was truly captured. I could have spent a whole week just wandering around and drinking in the amazing art on offer. I fell in love with Hans Hartung and Oskar Schlemmer (especially this and this). I loved seeing the Man Ray works, especially the original of this, a poster of which was on my bedroom wall for pretty much my entire teenage years! I saw Guernica, and all sorts of other Picasso works, lots of Miro and countless other awe inspiring works.
So you see, I have been so busy that to be honest I have only made one piece of jewellery since then - a Faux Cro bangle by Jean Power. I made it as a leaving present for my temp staff and I cannot begin to tell you how wonderful this pattern is to make up. Absolutely dreamy and you can do it whilst watching telly or listening to music and not really concentrating. Well, apart from when you get to the invisible join and then it's a little fiddly, but not overly so.
 As you can only just see, it's in a very pale pink with a silver lined grey spiralling round endlessly. She is a pale, blue-eyed blonde so she wears lots of delicate colours like this, although I had to get lots of second opinions as I hardly ever use pastels or muted colours!
 This picture is hardly any better but you can see that it's an actual proper bangle!
I am teaching Kathy tonight and I have so many ideas jotted down that I really ought to get myself in gear to make something blog-worthy!
So you see, I have been so busy that to be honest I have only made one piece of jewellery since then - a Faux Cro bangle by Jean Power. I made it as a leaving present for my temp staff and I cannot begin to tell you how wonderful this pattern is to make up. Absolutely dreamy and you can do it whilst watching telly or listening to music and not really concentrating. Well, apart from when you get to the invisible join and then it's a little fiddly, but not overly so.


I am teaching Kathy tonight and I have so many ideas jotted down that I really ought to get myself in gear to make something blog-worthy!
Sunday, 19 February 2012
Fluorite Cab
For Christmas this year my darling bratlet bought me some cabochon for bezelling. His favourite colour is green, so he bought me two green ones and then a fluorite one and a tiger's eye - I am a very lucky Mummy indeed! They're all 40x30mm and really pretty. So this week I decided to bezel the fluorite one.
As you can see, I also added some fluorite 8mm beads throughout the herringbone cord and used the 15s to frame them.

The clasp was a nightmare to do because I didn't want to just put a bead on the end, nor did I want a traditional toggle so instead I made up a beaded bead using three of the 8mm beads.
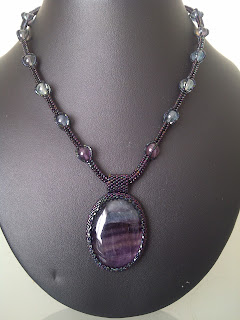 All in all, it's very simple but I'm pleased because although the dark iris beads do darken the cab significantly, they also bring out the deep purple veins in the fluorite.

The clasp was a nightmare to do because I didn't want to just put a bead on the end, nor did I want a traditional toggle so instead I made up a beaded bead using three of the 8mm beads.
 |
| View from the top |
 |
| Side view |

Wednesday, 15 February 2012
A Quickie
Was just catching up on Jean Power's blog and saw that her newsletter will be out in the next couple of days and will contain instructions to her Key To My Heart (picture behind the link)! I am already choosing a colour scheme for these and have a rivoli set aside ready!
If you enjoy peyote stitch and love beading contemporary styles, pushing beading boundaries then I urge you to sign up to her newsletter. Best thing? She doesn't spam you and every so often you get a treat like these instructions!
If you enjoy peyote stitch and love beading contemporary styles, pushing beading boundaries then I urge you to sign up to her newsletter. Best thing? She doesn't spam you and every so often you get a treat like these instructions!
Potowatomi Weave
A few years ago Mummy and I discovered Potowatomi Weave (instructions behind the link), well, I should say that she discovered it and taught it to me! This sweet little stitch makes up for one heck of a strong, flat weave. It's also really versatile: you can weave multiple rows of it and make a really strong base from which to embellish (although it looks pretty amazing as is), you can change the colours within the stitch to produce high contrast and interest, you can make chokers, bracelets, cuffs, and you can embellish a single row with dangles, much like the necklace and bracelet set I made below.

This was such a simple idea. I made a single strip of Potowatomi and then added amethyst chips along the bottom edge in an altered picot type edging. The amethyst chips are much smaller at the back and get bigger and darker the further round the front you get. The little bracelet was made in exactly the same way.
I haven't played round with this stitch half as much as I'd like to but I have played with it enough to say that delicas just don't sit as well as seed beads on this one! I must come back and revisit this stitch once I've finished the two projects I have on the go at the moment.
Sunday, 12 February 2012
Once More From Mummy!
My Mum read my blog post late last night where I showcased her work and sent me a text: "Gosh, not even the oglioliwali whatever made the cut! Thank you!" "oglioliwali whatever" is what we call Ogalala Lace Stitch (instructions behind the link).
This is the necklace that she was talking about:
 and I would have included it if I had a picture! So Mummy sent me this picture at half past eleven last night so I could share it with you!
She also made it in a really delicate lavender palette and that one is just as delicious as this one is.
This is the necklace that she was talking about:

She also made it in a really delicate lavender palette and that one is just as delicious as this one is.
Saturday, 11 February 2012
Showcasing Mummy's Work
As you've seen, I mainly seem to do big and bold beadwork. My Mum, however, is a much more delicate beader. Her work has a timeless elegance and a grace that I simply cannot emulate - no matter how hard I try! I thought that in this post I would showcase some of her work so that you can see how different it is to mine. Her choice of pattern, her palette and the style is ephemeral and daintily beautiful. We are complete opposites in our beadwork and I adore pretty much everything she does.
This piece was from a pattern (unfortunately I can't remember where she found it) and I love how she used a creamy seed bead with that warm amber colour as the accent. It's delicate and lacy and just so elegant.

This was another piece that she made from a pattern, and even though she's done it in haematite and black glass, she still makes it look so delicate and feminine. This necklace looks blooming gorgeous whenever it's worn!

A choker this time, in a modified Right Angle Weave. I'd have been tempted to do this in all black but she conjures up the Renaissance with her colour choices.

This was her first ever cabouchon! How unbelievably neat is that?! She thought the delicacy of the rose quartz would be lost on a beaded rope so instead she found some pale pink organza ribbon that matched the cabouchon perfectly and used that instead. It tied at the back in a large floppy bow and is ultra femme.


Mummy's very lucky in that she can go from being uber glam to being right in there with block colours and chunky cuffs! This was a pattern in one of the beading magazines we buy (either Beadwork or Bead & Button) and she absolutely adored it as soon as she saw it. The closure on the original pattern was with Margaritas but she wanted to echo the Art Deco drama so used gunmetal cubes for the closure instead. Personally I think this works better than the original pattern!

And then we go right back to old school Victorian beadweaving. She's a bloody marvel! I love this pattern so much because it sits at the base of the throat, collar length, and really makes you feel like a princess when you wear it!


And then once in a while she will make a real show stopper like this Gothic Reticule. We are lucky that in Leicester we have a huge selection of fabric shops and The Golden Mile, which is host to not only the most beautiful and ornate jewellery shops, but also a delicious array of Indian fabric shops selling the most exquisite silks and saree material. Together we trotted off down there to gasp at the opulence and she bought this fine silk fabric with which to line the reticule.

And then she made a bridal one in a slightly different pattern. Unfortunately this picture doesn't even begin to to do this reticule justice, nor does it show the detail of the tiny brick stitched hearts around the top.


So there you have it. This is all the work of my fabulous Mummy. I hope you enjoyed it as much as I always do. We are polar opposites - I think that just adds more depth and fun to our beading adventures in that we can look at the same component and dream up completely different ways and styles to use it!
This piece was from a pattern (unfortunately I can't remember where she found it) and I love how she used a creamy seed bead with that warm amber colour as the accent. It's delicate and lacy and just so elegant.

This was another piece that she made from a pattern, and even though she's done it in haematite and black glass, she still makes it look so delicate and feminine. This necklace looks blooming gorgeous whenever it's worn!

A choker this time, in a modified Right Angle Weave. I'd have been tempted to do this in all black but she conjures up the Renaissance with her colour choices.

This was her first ever cabouchon! How unbelievably neat is that?! She thought the delicacy of the rose quartz would be lost on a beaded rope so instead she found some pale pink organza ribbon that matched the cabouchon perfectly and used that instead. It tied at the back in a large floppy bow and is ultra femme.

This was made from a pattern from The Bead Shop kit that she bought a few years ago. The beads that came with it were much more vibrant but she loved how the pattern flowed so she made it in silver and amethyst. It looks so delicate but is actually pretty robust!

Mummy's very lucky in that she can go from being uber glam to being right in there with block colours and chunky cuffs! This was a pattern in one of the beading magazines we buy (either Beadwork or Bead & Button) and she absolutely adored it as soon as she saw it. The closure on the original pattern was with Margaritas but she wanted to echo the Art Deco drama so used gunmetal cubes for the closure instead. Personally I think this works better than the original pattern!

And then we go right back to old school Victorian beadweaving. She's a bloody marvel! I love this pattern so much because it sits at the base of the throat, collar length, and really makes you feel like a princess when you wear it!

This is another of her cuffs made using elements from Jean Power's Freeform Cuffs and then framing the beads. I love how subtle her colours are and how they blend and complement so perfectly. Her refined use of colour is what I am most jealous of.

And then once in a while she will make a real show stopper like this Gothic Reticule. We are lucky that in Leicester we have a huge selection of fabric shops and The Golden Mile, which is host to not only the most beautiful and ornate jewellery shops, but also a delicious array of Indian fabric shops selling the most exquisite silks and saree material. Together we trotted off down there to gasp at the opulence and she bought this fine silk fabric with which to line the reticule.

And then she made a bridal one in a slightly different pattern. Unfortunately this picture doesn't even begin to to do this reticule justice, nor does it show the detail of the tiny brick stitched hearts around the top.

Finally, Mummy at her most simple. A plain peyote tube hung with haematite arrows and slid onto a neck wire. Gorgeous.

So there you have it. This is all the work of my fabulous Mummy. I hope you enjoyed it as much as I always do. We are polar opposites - I think that just adds more depth and fun to our beading adventures in that we can look at the same component and dream up completely different ways and styles to use it!
Subscribe to:
Posts (Atom)